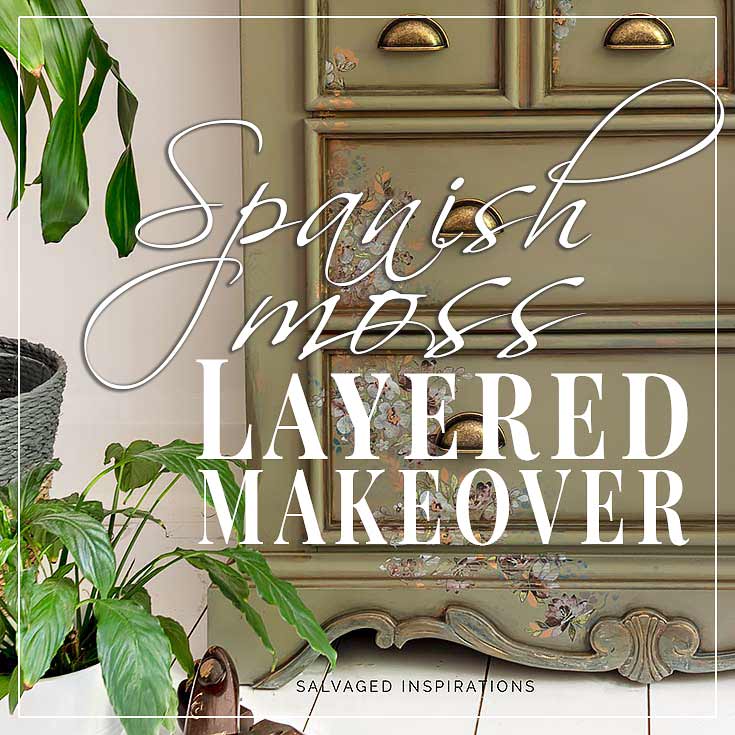
HOW TO LAYER PAINT AND PRODUCTS TO ACHIEVE THIS GORGEOUS SPANISH MOSS LAYERED VINTAGE DRESSER MAKEOVER!
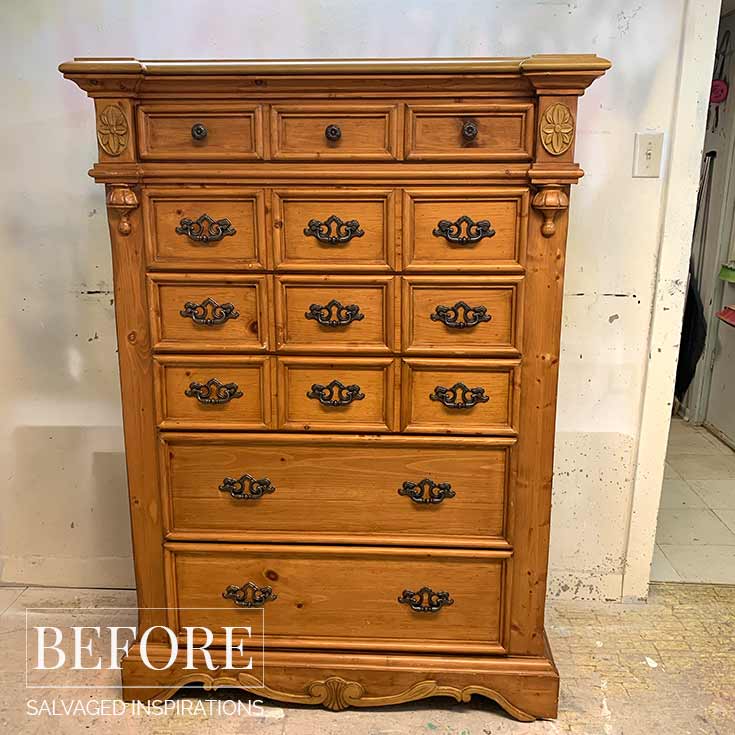
Even after all these years of painting furniture, I had a nervous-excitement starting this dresser because I really wanted to do it justice. I don’t often work on ‘perfect-as-is-pieces’ like this. This dresser required NO repairs, NO fill, NO adjustments. It was a pick-up and paint project.
For you wood lovers, out there, you may have mixed feelings about covering up this pine, but that said, I’m ecstatically happy with the new look.
I implemented some of YOUR ideas and suggestions you left me on Facebook to come up with this Layered Spanish Moss Finish! I have to admit, amalgamating your FB suggestions is becoming a fun challenge for me, so thank you!
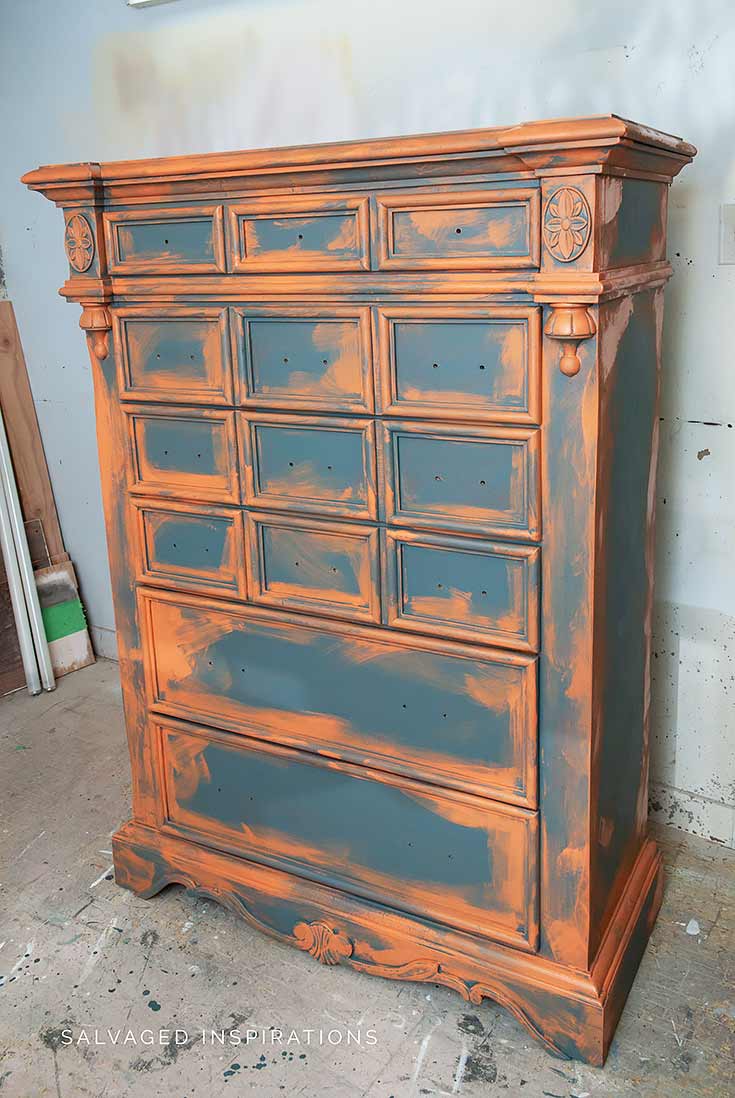
Here’s what I started with…
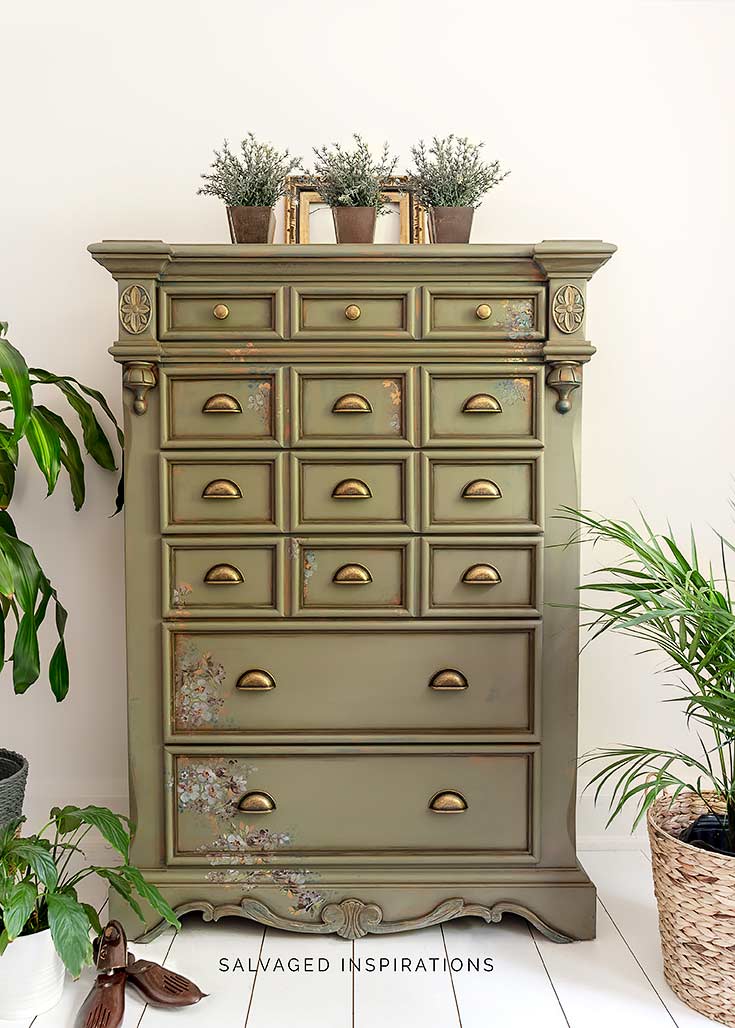
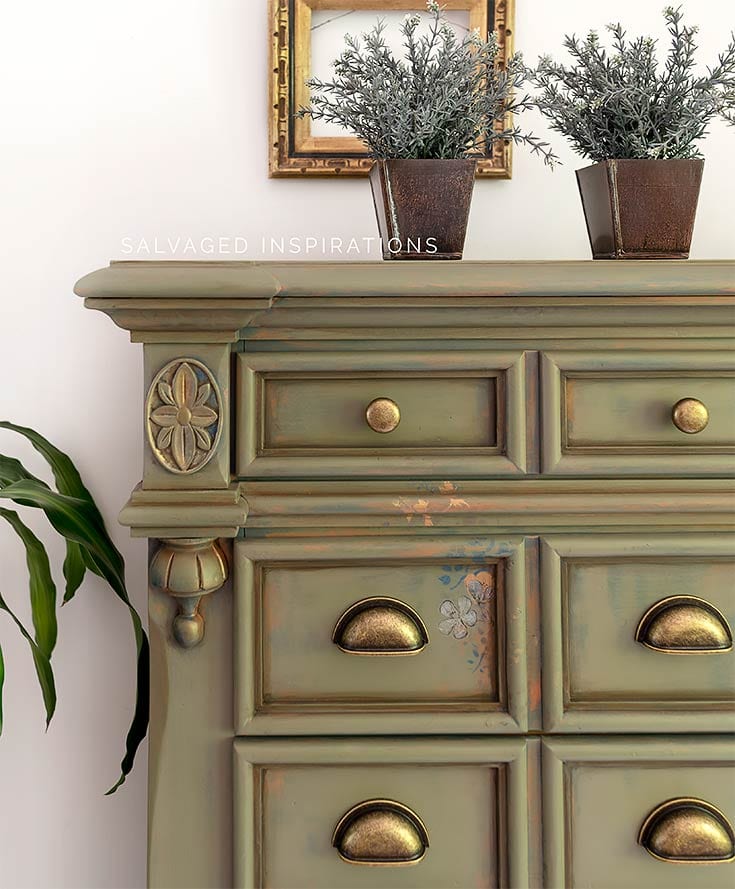
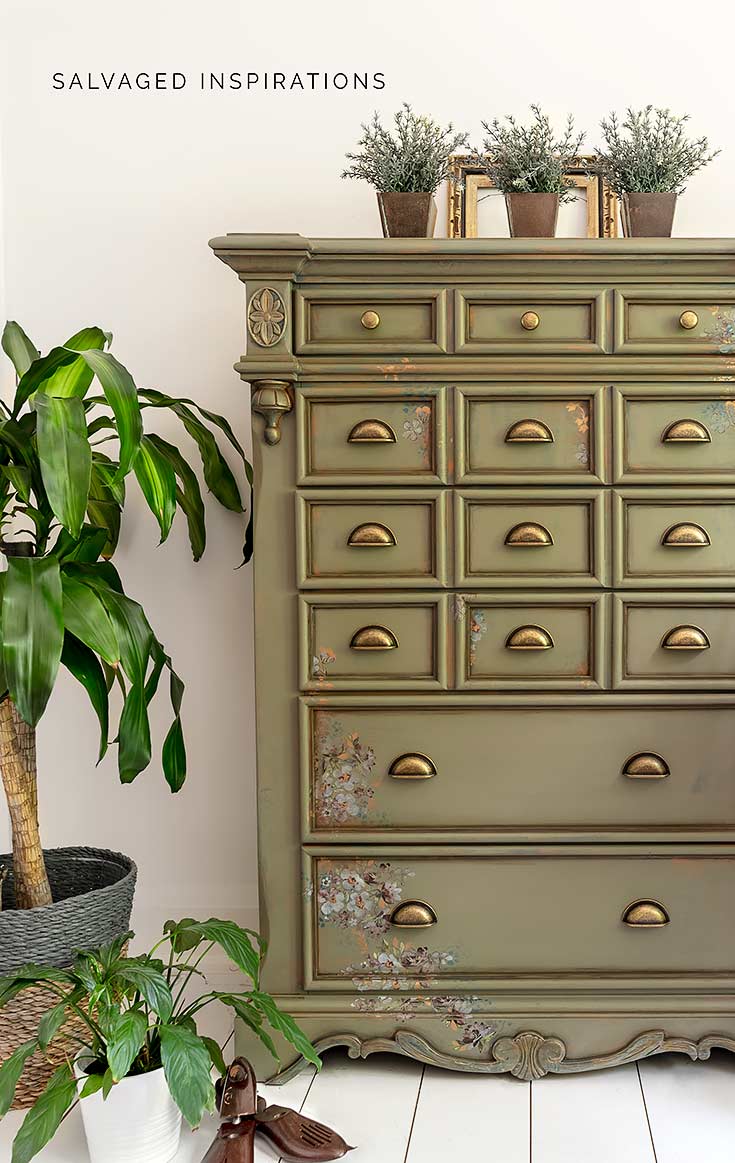
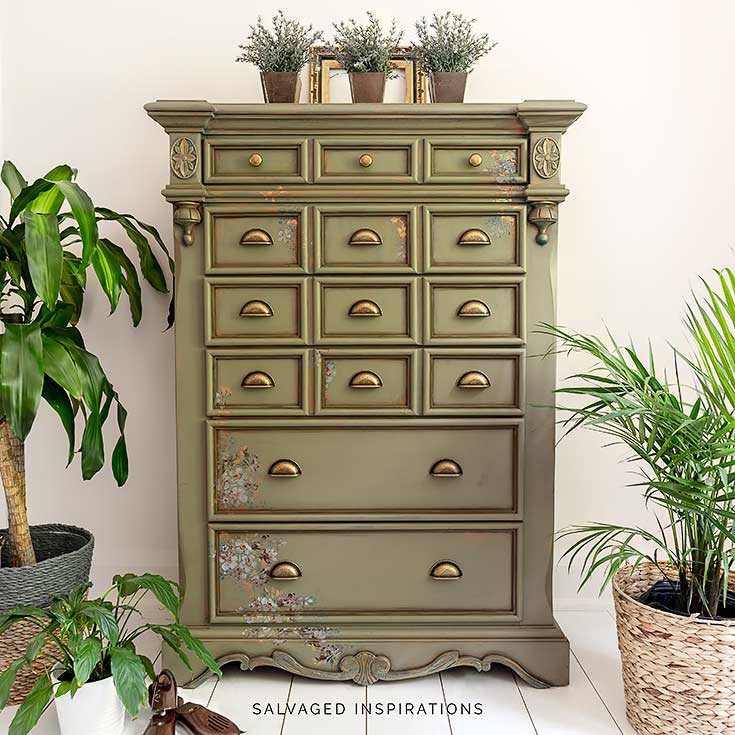
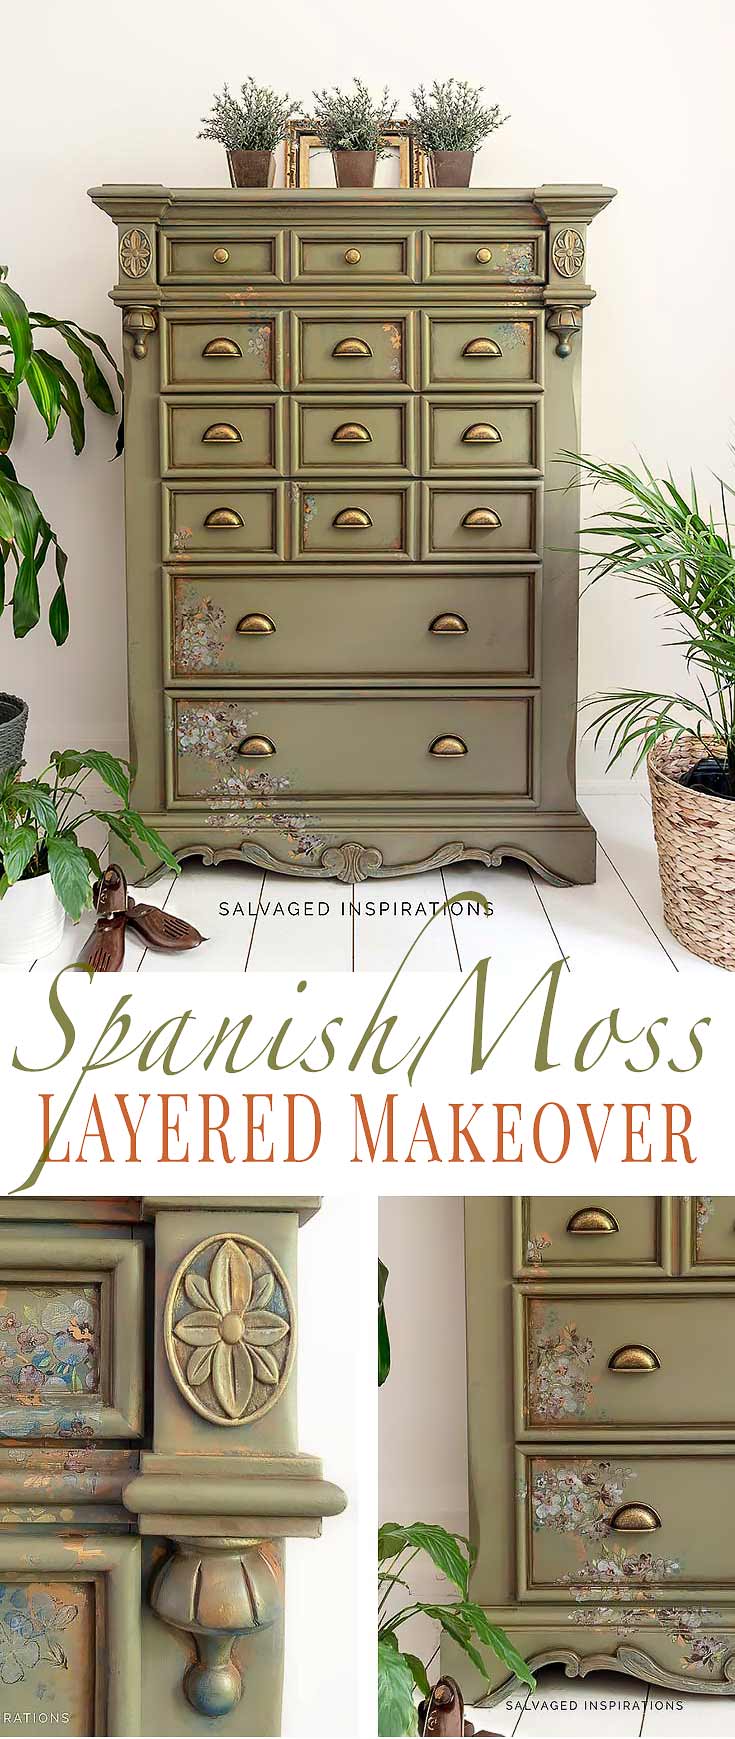
Here’s the after. Feminine. Stately. Regal. Simply lovely… what do you think?
THIS POST IS SPONSORED/CONTAINS AFFILIATE LINKS TO PRODUCTS I USE. YOU CAN SEE MY FULL DISCLOSURE HERE.
SOURCE LIST::
SPANISH MOSS LAYERED DRESSER::
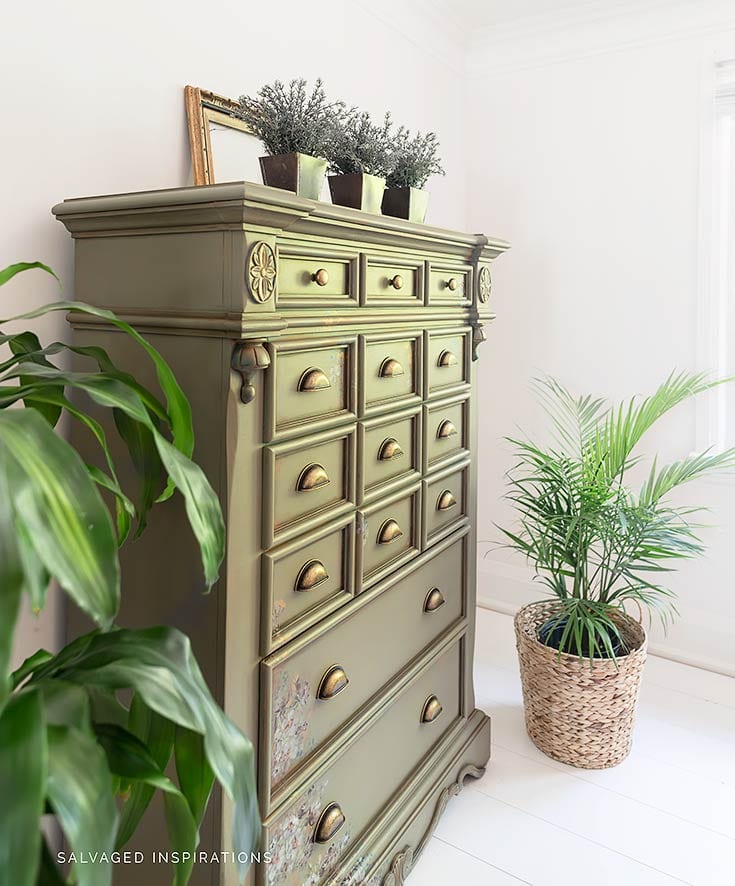
I started by giving this tallboy a good cleaning and then layering on a few colors. I started with Stormy Seas blue/gray, then added a terracotta. I know – looks a little scary at first.
After the first 2 layers dried, I applied my first coat of this Spanish Moss. The first coat still has quite a bit of the base colors showing through. When layering paint, it’s easy to adjust how much of the base colors show through simply by applying another coat.
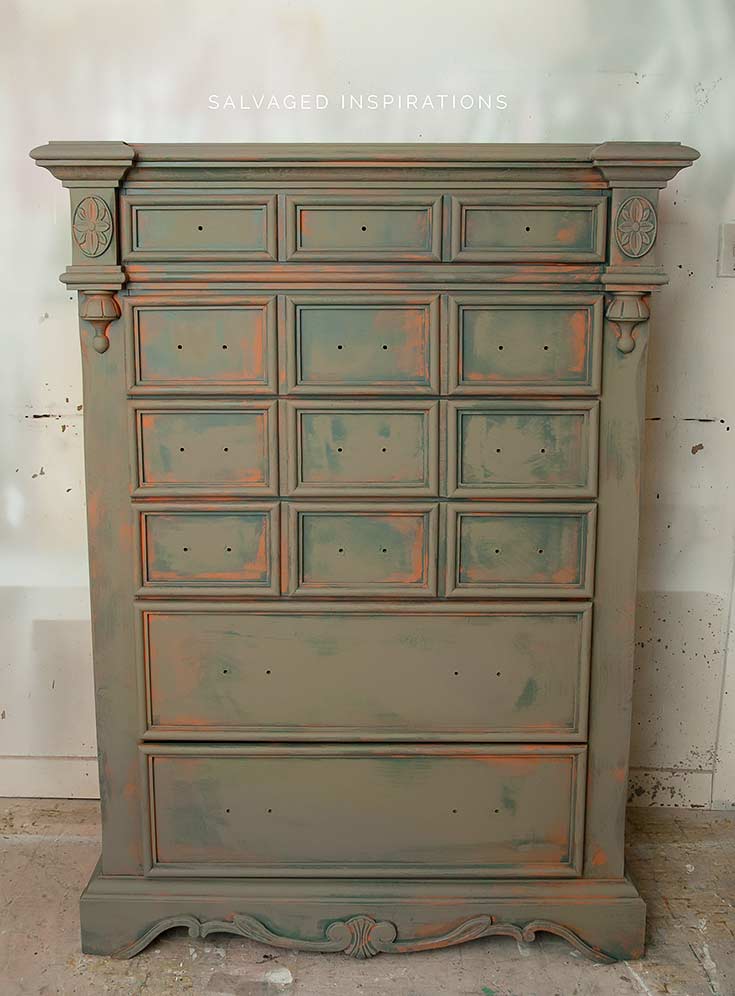
After I added another coat of Spanish Moss I started layering products.
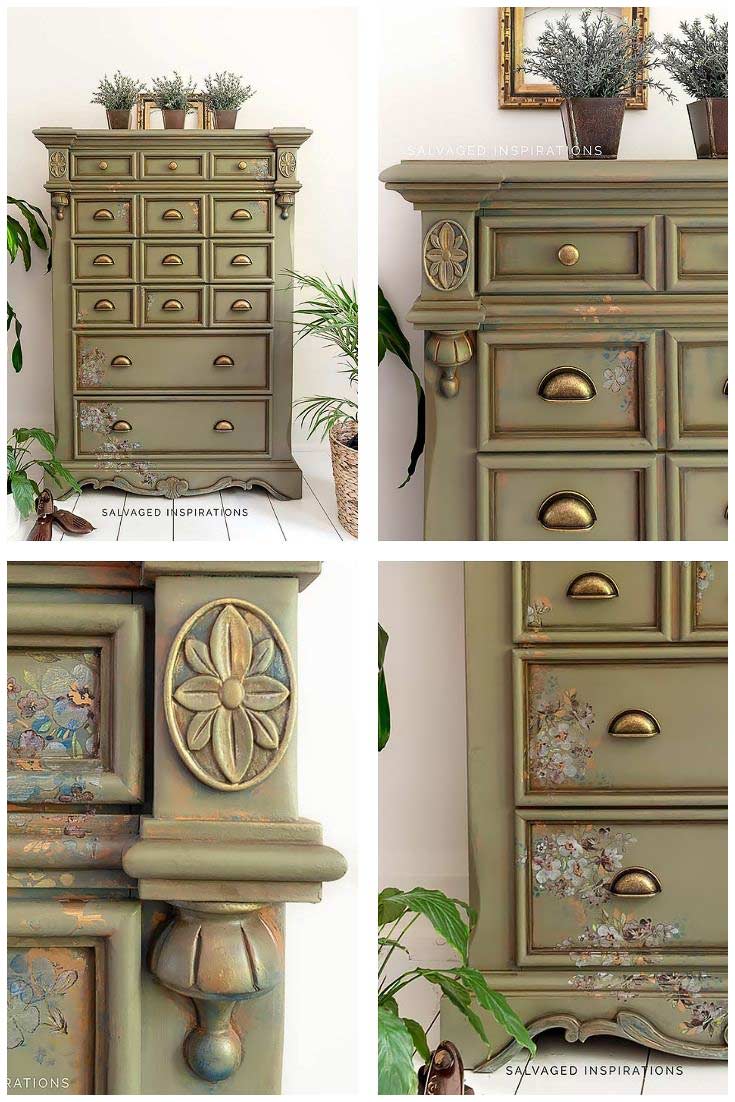
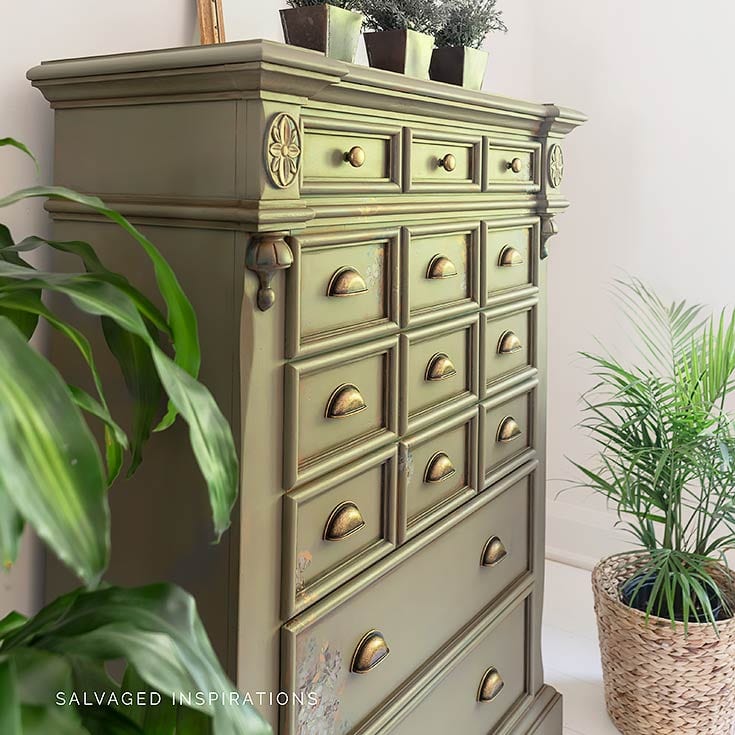
To add extra depth to the drawers, I used Van Dyke Brown Glaze on the inside of all the drawer frames. A small artist’s brush got right into the corners and edges and then I wiped off the excess glaze with a shop towel.

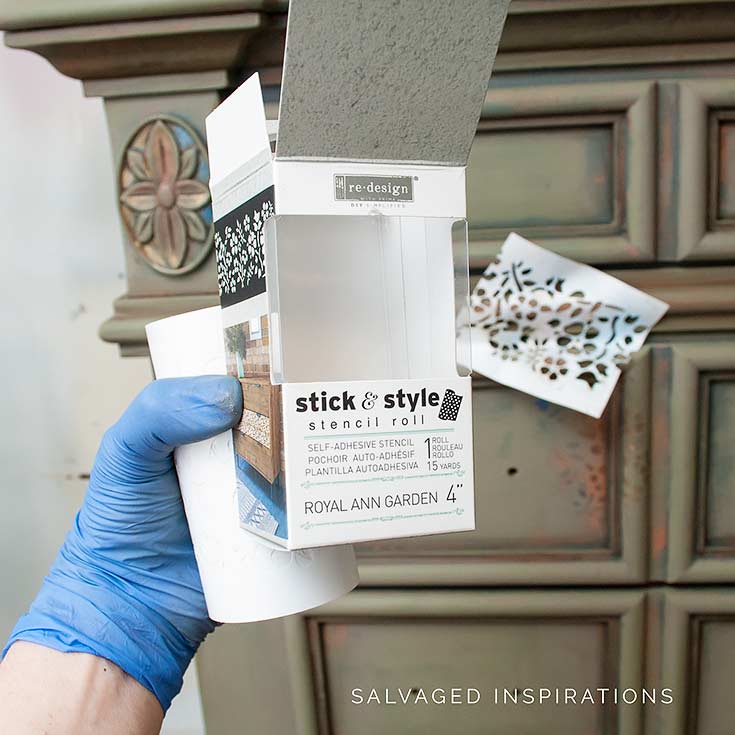
Royal Ann Garden Stick and Style Stencil with Blue and Gold Decor Waxes were applied randomly to some of the top drawers and to the bottom left side.
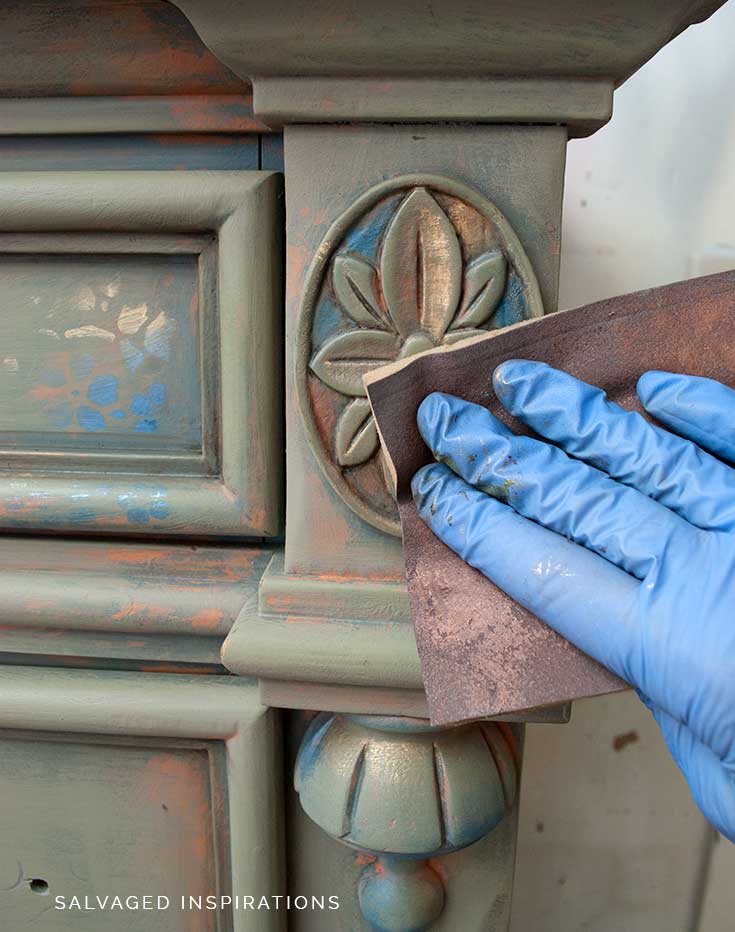
Then used the same color decor waxes to highlight the details on this piece.
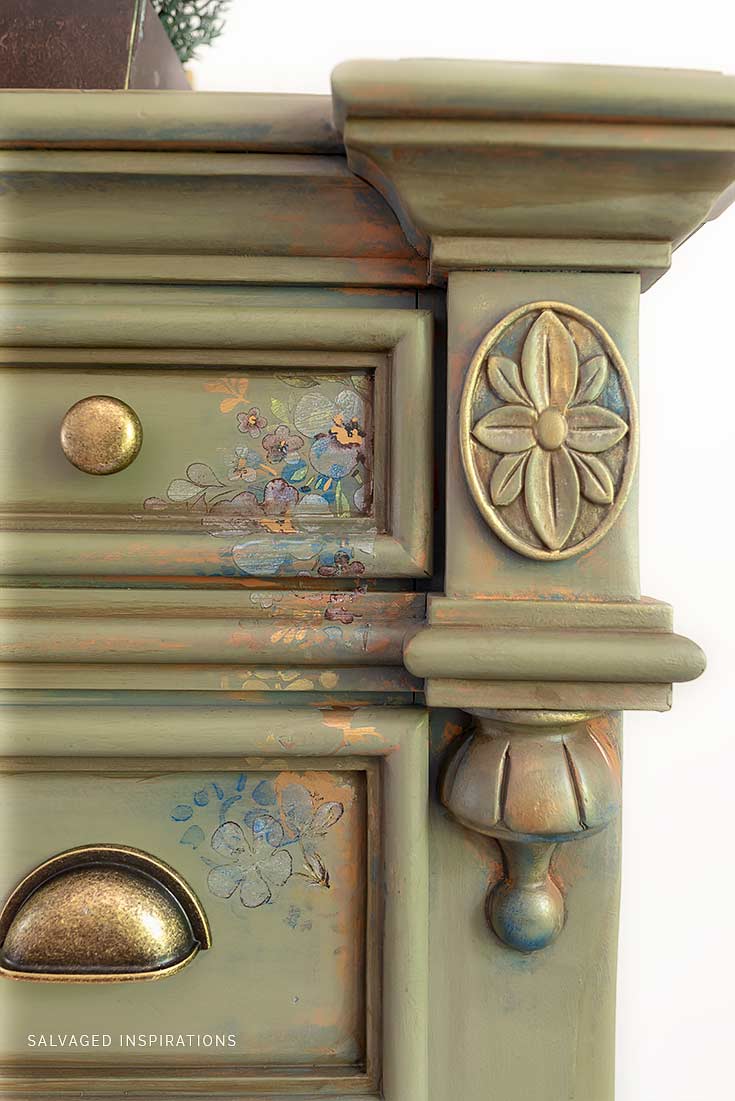
Lavender Fields Furniture Transfer was applied over the stencil for a layered peek-a-boo effect.
This is a little trick I use to finish off leftover furniture transfers. I don’t want them to go to waste but sometimes what I have left looks a little sparse on its own. If you layer it over a stencil design, they blend nicely and cover a larger area.
Can you see the metallic stencil design peeking through? They work beautifully together.
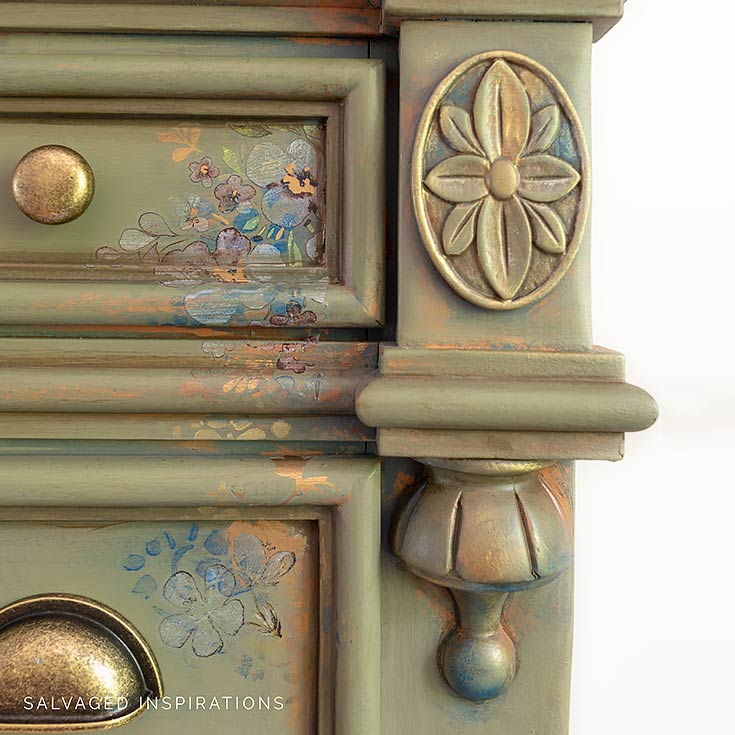
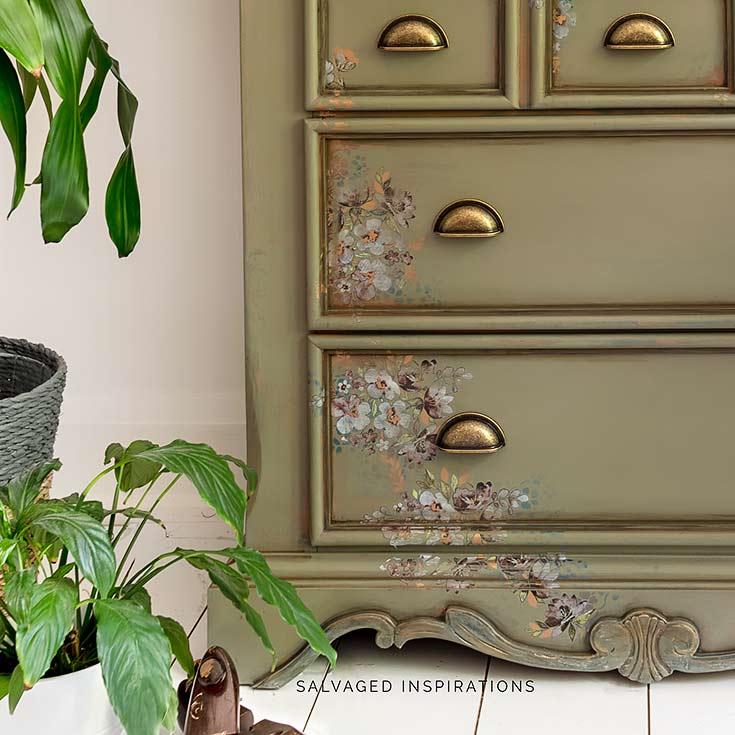
The Terracotta, blue and golds tie this piece together really nicely.
And can we talk about hardware ugggh? I ALWAYS fill the original hardware holes because it provides me the option to pick whatever type of handle or knob after my piece is painted.
This time I thought I’d keep the old hardware…I figure it suited the piece nicely.
NOPE.
Once the piece was restyled, I knew cup handles were the way to go so I was running around yesterday shopping for new hardware to fit the original holes. I’m really happy with the new hardware though!
LET ME KNOW WHAT YOU THINK OF THIS SPANISH MOSS LAYERED MAKEOVER… OR FEEL FREE TO ASK ANY QUESTIONS YOU MAY HAVE… I ALWAYS LOVE HEARING FROM YOU. IT MAKES MY DAY! 💙
Happy furniture painting my friends!
Denise x
RELATED POSTS::
How To Apply Furniture Transfers
7 Furniture Stenciling Tips
How To Apply Gilding Decor Wax
Stop Bleed Through When Painting
Layering Chalk Paint | Empire Makeover
PIN AND SHARE!

What a transformation! I could not envision what one could do with a beautiful piece like this! But you found the magic formula. It is so awesome and I love the different layers and textures you used to create this masterpiece. I really like the stencils and the transfers. You are so creative, and I appreciate your sharing your process with us. Thank you for giving us an inside peek into your genius! Love the results!
Thanks so much Sue! I’m really pleased with how it all came together too! And I’m so happy I used up the last of my furniture transfer with the help of the stencil… love finding new ways to make things stretch. 😉
Denise, I rarely comment on blog posts, but I am so blown away with this transformation that I just had to write. The cup handles are what I noticed first…absolutely love them! But then when I read and saw all the innovative steps you took, starting with different colors, adding glaze and stencils and image transfers…I was in awe of your creativity. Did you have a plan, or did these steps evolve as you worked? I would never have the confidence to do what you’ve done, but I am so inspired by your makeovers. Thanks, and look forward to more of your makeovers!
Hi Linda and thanks for taking the time to comment… it means a lot! 🌸 Most of the time I start with some sort of a ‘plan or vision’ but often the pieces take me in another direction. For instance, I was set on using the original hardware on this piece and then changed my mind at the last minute. So glad you like the cup handles.. I like them much better too. The colors I planned out and then the Lavender Field Furniture transfer popped into my head as I was painting but I didn’t have enough left over so I improvised with the stencil. Long winded but that was my thought process for this piece. And as a side note, never say never! 💕
Your art is admired …………………
Thanks so much Morteza! x
OMG, I friggin loove ❤ this makeover! Awesome transformation Denise 👍👍
Hi Annie!!!! 😃 Thank YOU!!! XOXO
Oh my – a “”Pygmalion” of a transformation. From a “Plain Jane” to a graceful “Fair Lady.” Beautiful and oh so regal!
I just googled what “Pygmalion” was… thank YOU, Barbara!💜 I should have waited until my significant other came home and asked him because he’s Greek. 😉
Stunning…I am so inspired! My favorite color. …want to run out and buy it right now!
Thanks Peggy!… and you should. Treat yourself!! 😉
Absolutely stunning! It looks like a prop from a classic movie. You did one fine job Denise! Kudos! xoxo
Thank you so much! Gorgeous website btw! 🙂
Thanks!
Beautiful piece. Love the color and the stencil/transfers really added to it’s beauty.
Thanks Joanne! xo
Denise, what a color combination!! I would have never have thought to put these together. You have a true artist’s eye..and heart. You can definitely tell you love doing this. I love the transfer over the stencil idea, Again, a true artist. I guess that is what scares me. I have had the same piece on my rollers for 2 weeks trying to decide what to do. I am not an artist but I am trying to get there. Thank you for your inspirations and your step by step instructions I need to tape them all over my wall so i don’t forget what steps to take. LOL. Now i will go home and patch up the hardware holes in my piece. Where did you get your hardware? This is a beautiful piece Denise. Thank you so much!
P.S. What am i supposed to put in the “Website” box below? I always leave it blank.
Hi Cheryl!! I found the cup handles with matching knobs at Lee Valley. Thankfully they matched the existing hardware holes because I didn’t fill them in like I usually do… I was positive I was going to use the original hardware HA! And feel free to leave the “Website” box empty. No need to fill anything in. 🙂 Have a great day Cheryl!
This turned out beautiful. I love the colors and the added floral design. I have an old “ mid-century modern” bedroom set that I’m dying to do something with. This was some great inspiration❣️
thank Lorrie! And ya, something like this would look amazing on your MCM set!
A true work of art.. I’m not a big fan of all painted furniture but this piece I’d put in my home. Very talented Denise..
Thanks so much Sher! x
Absolutely fabulous!
Julie xo
Thanks my friend. XO
Magnifique! Very reminiscent of the bureau you did in olive & gold leaf run-n-buff. Love that color scheme.. I agree that the orange wood color is much improved by covering it up. Gorgeous details on this piece..
YES, I forgot about that piece…lol!
OMG ! This is stunning 💕 I can not stop looking at it, I absolutely love it! You are an inspiration dear Denise 🥰
Hi Mara! Thanks so much, I’m happy you like it! It’s raining here so I hope you’re staying dry. 😉
Girrrllll….This is absolutely beautiful! You are a gifted lady.
That’s super sweet, thanks, Delores! xo
Gorgeous!!
thanks so much, Jill! XO
Love love love! I would have hesitated to cover the pine as well since it was in such great condition, but the finished product is amazing!
Hi Denise! I’m getting my fair share of ‘Denise’ followers… LOVE IT…lol. Anyway, ya I found this piece on FB Market Place and picked it up with every intention of painting it. When I got it home and saw what great condition it was in a little nervousness crept in because I wanted to do it justice. I’m really happy with the finished look though. Much more updated. 🙂
This is a true work of art Denise. You’ve managed to perfectly balance this dresser with color, design and a touch of shimmer in a classy way. This is one of my all time favorites. Thank you for sharing! ~ Nicki
This means a lot Nicki…thank you SO much! XO
Stunning! And I am glad there is no sanding in-between layers of paint!
Love love love the moss green color!
Thanks Robin! And sanding between coats when doing this layering technique is optional.
This is just gorgeous. I adore this piece, which I assume is the customer’s own. I am always looking around for exquisite pieces of quality like this to paint for myself, but they aren’t easy to find. I love your trick of using the small leftover transfer pieces OVER the stencil – something I hadn’t thought of but sure do LOVE this look. This is another stunner of yours. Keep them coming. I always love to see what you are doing and appreciate all the great, informative info!
Hi Linda! I’m so glad you’re finding the tips helpful and thanks for all the kindness! 🙂
Hi Denise. I agree that this dresser was pretty as it was, but now it’s absolutely STUNNING! What an amazing transformation. I love how you layered the paints and the intricate flower designs. You are a true artist. Classic, timeless, and beautiful. LOVE. LOVE. LOVE.
Thanks, Monique! XO
You are a TRUE artist! Beautiful!!!
Thanks, Teri!!! And thanks for all you do. 🙂
Totally beautiful, extremely well done. You are truly an inspiration, I’m glad you will be teaching at that seminar thing.
Thanks so much, Mary!! XO
Wow, you really know how to knock it out of the park! This is a beautiful transformation from bleh, to what!, to Wow!!! Don’t know how you come up with your amazing ideas, but I am so glad to have found your inspiration. Love every bit of this project.
Thank you Carol!! And I love your bleh, to what to wow! 😉 Super cute!
Beautiful piece; love all these colors together!! Were the decor waxes from Dixie Belle or somewhere else? Another “inspiration” for me!!
Thanks, my friend! XO The decor waxes are from redesign with prima this time. They sent me some to try out and I love them. They give the same effect as the DB Gilding waxes but are creamier to work with. 🙂
Wow that is beautiful ! Especially using the stencils!. It’s the layering…you have real vision to make that all work together. Just beautiful!
Thanks so much, Tammy!! XO
Oh my! This has got to be one of my favourites, if not THE favourite of anything I’ve seen! It’s just gorgeous and I love the stencil/transfer technique and just enough to add interest without over doing it. The green colour is beautiful too. Very classy piece.
THANK YOU!!! I’m so glad you like it Tania and what a huge compliment. I think she’s pretty classy too. 😊
ABSOLUTELY GORGEOUS! !!!
I just adore EVERYTHING you do. You are a true artist.
I do have a question… Did you use the colors in the stencil to guide you in your paint color selection ?
Thank you Maria! And good guess. 🙂 I used the paint colors to guide me in picking the color(s) of Decor Wax for the stencil… so the other way around. I used re-design’s Decor Wax in “Gravity” (the blue) “Amber Lights” (the orangey terracotta) and then “Eternal” for a pop of warm gold.
Denise,
I can’t even begin to say how much I absolutely love what you have achieved! Oh my goodness! It’s gorgeous! I just rescued a vintage dresser and would love to attempt your layered technique. I was thinking of doing a sage green color so this would be perfect if I am able.. Thank you so much for sharing your talent!
Thanks so much Denise! I’m a huge fan of greens. Two of my favs are here and here with the latter actually in Sage Green! 🙂
Love how you layered the furniture transfer over the stenciled detail – brilliant! Another absolutely stunning makeover, Denise. What wood lover would slap you with a wet noodle over the results of this makeover? Pinned 🙂
Oh, I’m sure there are a few…lol… but so long as they only use a wet noodle – I guess I’m okay. LOL 😉 Thanks for the PIN!
This piece turned out lovely, what a transformation, but so much work! I wish I had your talent for layering colors because that makes all the difference in the end product. I have a lovely French style secretary I want to paint but too afraid to start it. Thank you for you. Ideas however..
Thanks Linda! And lucky you, I love those French Style Secretary Desks! As for being afraid to start, VERY normal. When I first started painting, I didn’t do all this layering of paint and product either. Last Thursday I posted on my IG about this. I posted a simple painted thrift store lingerie bureau that was painted solid soft blue with a change of hardware. It’s perfect in my opinion. Simple can be beautiful and REALLY update a piece and it’s the best way to start.💙
Denise, this is absolutely beautiful! I am a Dixie Belle Retailer and I love following your posts. What a beautiful vision you had for this piece!
Lois Lavery
Hi Lois, thank YOU and thanks for following! Are you coming to the DB + Prima conference in September? If so I can’t wait to meet you and if not we can hang out here. 😉
I love your work! I am new to your blog. My question is – can my projects be successful if I use various brands of furniture decor products. For instance can I use Annie Sloan chalk paints with a Dixie Belle metal paint and patina spray. Thank you!
YES, of course!! Paint companies/brands would LOVE for you to stick with their full line of products for obvious reasons. That said, I’ve mixed and matched a ton of products keeping in mind what goes tother – waterbased w waterbased for instance. A good example is this piece. Rather than use Dixie Belles’ clear coat I opted for Varathane Waterbased Satin because I wanted to use my spray gun to topcoat the entire piece. 🙂 Go nuts and have fun experimenting… that’s half the fun imo. 🙂
Your Spanish Moss makeover is absolutely beautiful. The layering of the colors you chose are something I would never
have thought of but now that I have seen what you did I am inspired. I love the bits of stencil designs peaking out here and there.
Thanks so much, Rita! And if I’m honest, sometimes the colors I pick even shock me… but it seems to work so I just go with my gut. 🙂
I love, love, love how this piece turned out!
I so want to try this but not sure what the end result will be for me , a first timer !!
I love getting inspired by your projects!!
Keep them coming, maybe I’ll get brave and try .
Do you always use Dixie Belle supplies and is it all available on line?
Hi Robin! Thank YOU! I hope these posts inspire you to dive in and give something a go. It’s only paint and seriously not the end of the world even if something doesn’t turn out. Believe me, I’ve had my fair share of redo’s that you can check out here. As for paint brand, lately I’ve been using a TON of Dixie Belle paint/products but I’ve used many brands. Annie Sloan, Fusion, Milk Paints, Bluestone House, Sherwin Williams, Behr, Aura, even Loop Recycled Paint to make my own DIY Chalky Paints.
I really loved the original piece, and can see if you were torn about painting it. The finished piece is just gorgeous! Good job!!
Thanks so much Cate! It really was/is a gorgeous piece either way. 🙂
You have gone over the moon with this one! When your putting the layers of paint together, do you just go by trial and error, or have you made sample boards to see what you want to do? Thanks for giving such detailed information and instructions. You are truly a talented artist.
I probably should make sample boards but I never do. I usually mull over color combos by setting the paint jars side by side… usually on top of the piece about to get a makeover and then hope something catches my eye and inspires me. Like I was saying to Rita (previous comment), sometimes the colors even shock me but they seem to work. Worst case scenario, I repaint over it… and thats happened a good few times too! 😉
I absolutely love this piece! I love the layering effect, the stencils, the color, the handles – EVERYTHING! You are a mastermind and very talented in your vision for turning a piece of wood into a work of art . Everything you touch turns out beautiful! Please keep sharing your craft with us!
That’s super sweet of you to say, Angie. Thank YOU!! XO
Absolutely beautiful!! You are so talented and creative. J
Thank you Jane!!💜
Gorgeous! I have trouble waxing large expanses. Did you only was drawer corners or did you dark wax the whole piece? Thanks!!
Hi Christina! I didn’t use any wax at all on this piece. I dark glazed the inside lip of all the drawers and then used Varathane Poly to topcoat the entire piece with my spray gun. When I do wax large pieces, I like to work in small sections though. I find it easier to wax on wax off in smaller areas rather than an entire front face or large side.
Beautiful- thanks for the inspiration
Thanks Sandra!! x
Another gorgeous transformation, Denise! I always feel inspired after looking at your posts. Looking forward to the next one!
Thanks, Mariah! XO
Can u explain how u applied a transfer to the rod edges ? I just can’t figure that out. I have a dresser that has them and I don’t know what to do. I love the Spanish moss idea. Thanks
Sure. I place the transfer on the flat part of the drawer (inside the lip) first. Smooth it out and make sure its sticking then start to rub on. Then I work my way out. So the corners and trim of the drawers. I keep the transfer flat with my fingers as I’m rubbing it on. (a video would better explain this so I’m going to keep that in mind!) The design doesn’t go on perfectly. I do end up with some cracks and sometimes missing pieces but that’s okay. It adds to the character. 🙂
Wow! The Spanish Moss dresser is stunningly beautiful! Love it!!
Thank you Sylvia! XO
I couldn’t have imagined how much different hardware would improve & complete this transformation, but it’s perfect!
Thanks! I’m really pleased with the new hardware too! xo
Love this color combo. How rich and detailed!! You nailed it again, my friend.
Aw, thanks Susie! It was a fun process.. aside from not filling the hardware holes and having to hunt for perfect hardware that fit at the 11th hour. lol
OMG! That is absolutely Gorgeous
Thanks so much, Colleen!!! XO
The whole piece is absolutely GORGEOUS! One question: did you ‘antique’ the hardware or did you purchase as is? It is exquisite!
Hi Denise… and thank you! The hardware was purchased exactly as seen. Thankfully I found (what I believe) to be the perfect match for the piece and didn’t have to make any adjustments. 🙂
Oh yes! Painting that pine was the way to go! Beautiful outcome, Denise! You added more to the piece, and somehow made it look less “busy.” Wonderful!
Aw, thanks, Patricia!! XO As I mentioned it was such a perfect-lovely piece I was a little nervous. But I think painting is was the way to go too. I like it SO much better now!
It’s exquisite–and honestly I don’t usually love painted furniture–but this is a work of art.
Oh, Susan THANK YOU! xo