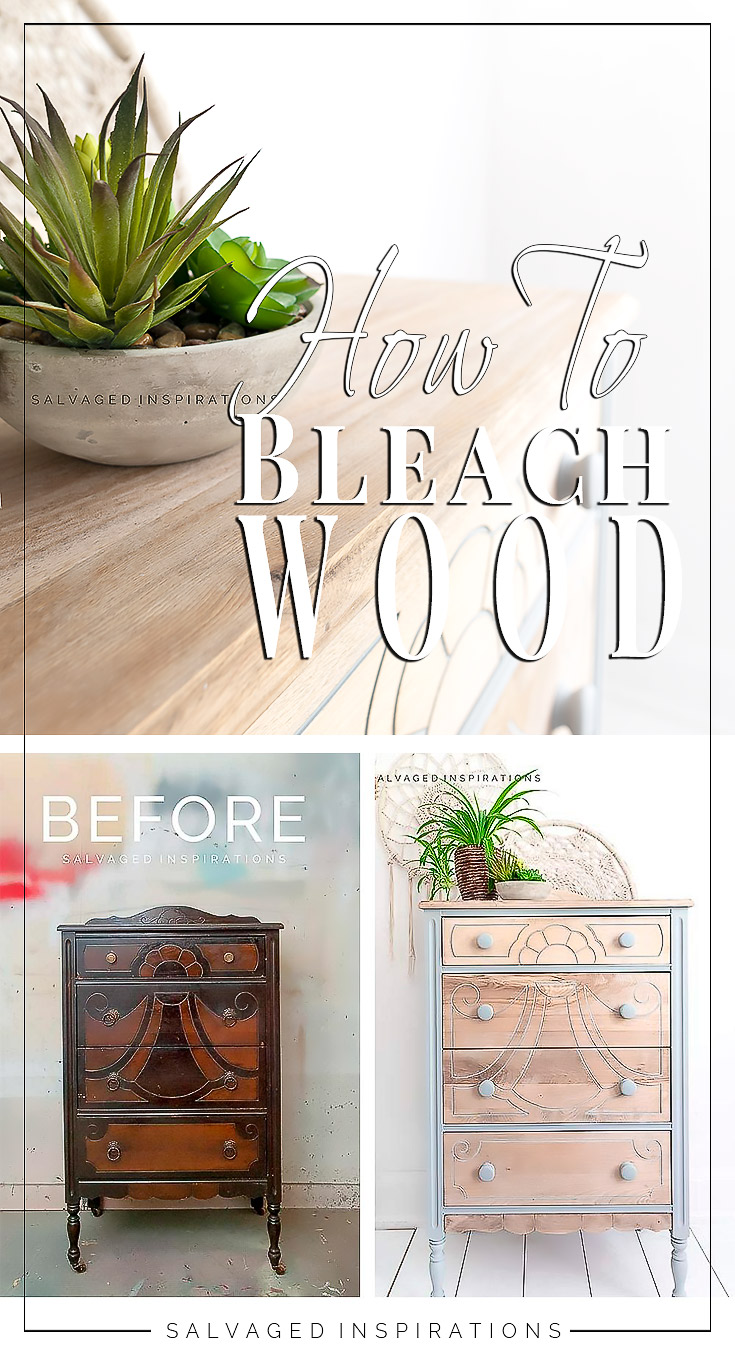
This week I tried a new-to-me furniture refinishing technique – Bleaching Wood! Here’s how it all turned out…

Hi sweet SI family! Thanks for joining me on one of my favorite days of the month – Trash To Treasure Tuesday! I’ll be sharing links to my talented T2T crews before and afters at the bottom of today’s post.
But first, this week I tried a brand new refinishing technique —– Bleaching Wood.
I’ve always wanted to try this and now that I have, I don’t think I’ll be doing it again. I’ll explain why down below.
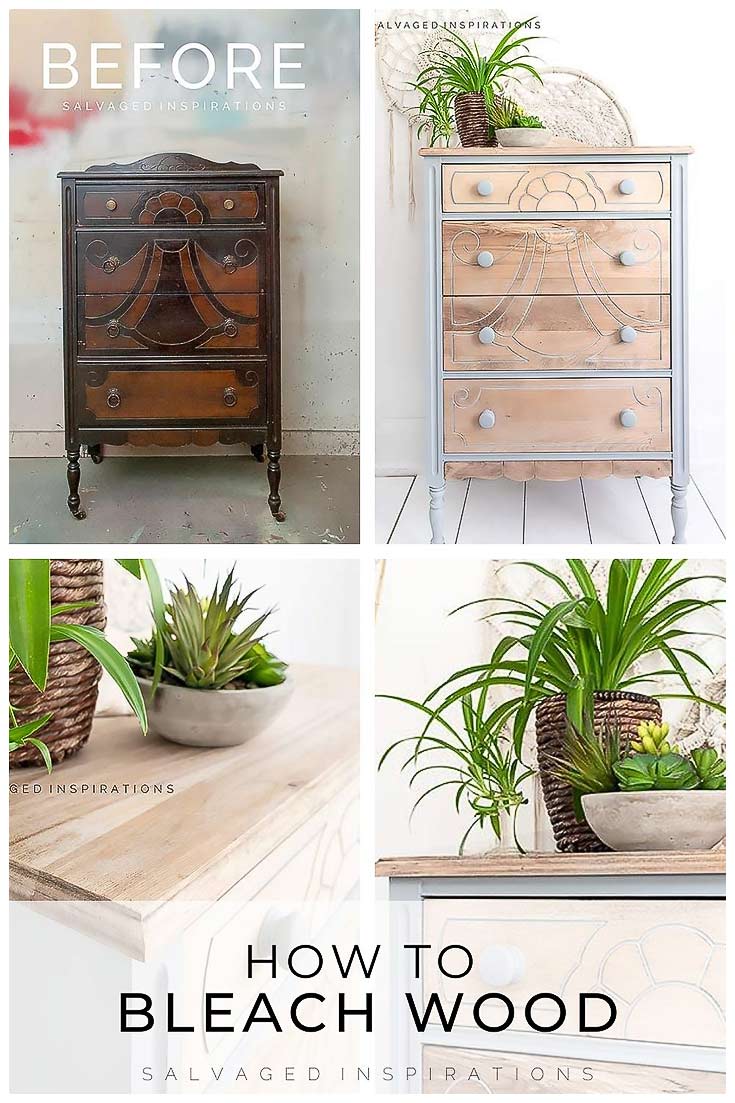
Here’s what I started with. It was the first time since March that I headed out for a furniture pick-up. I can’t tell you how good it felt to bring home some new inventory!

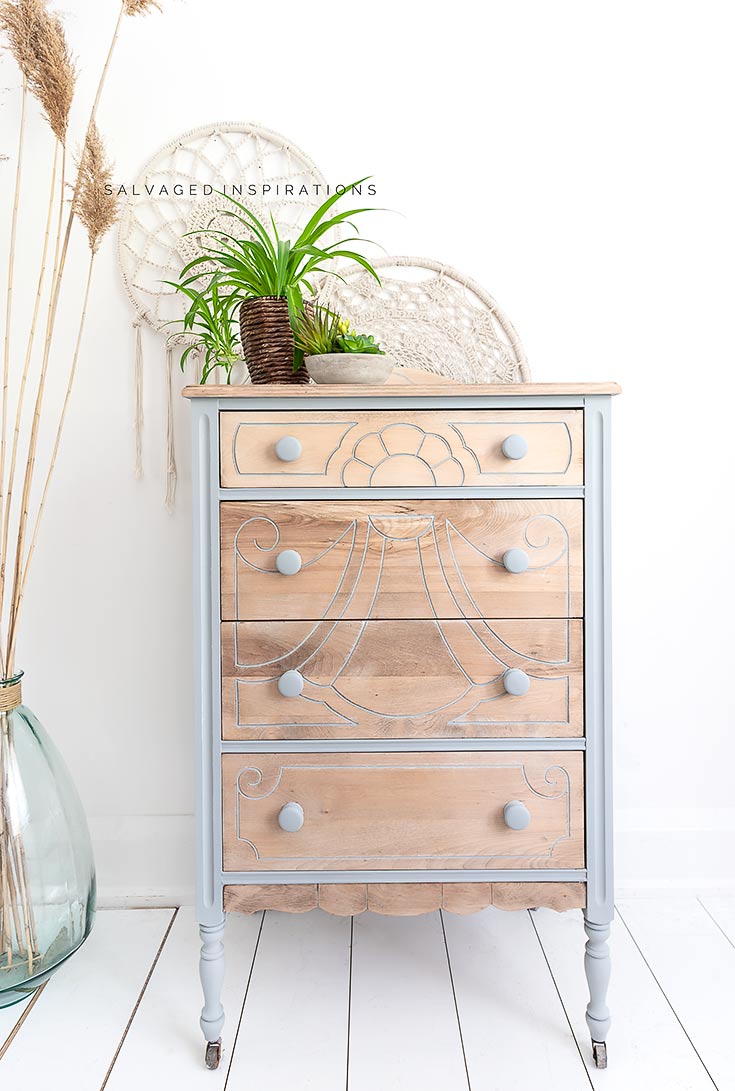
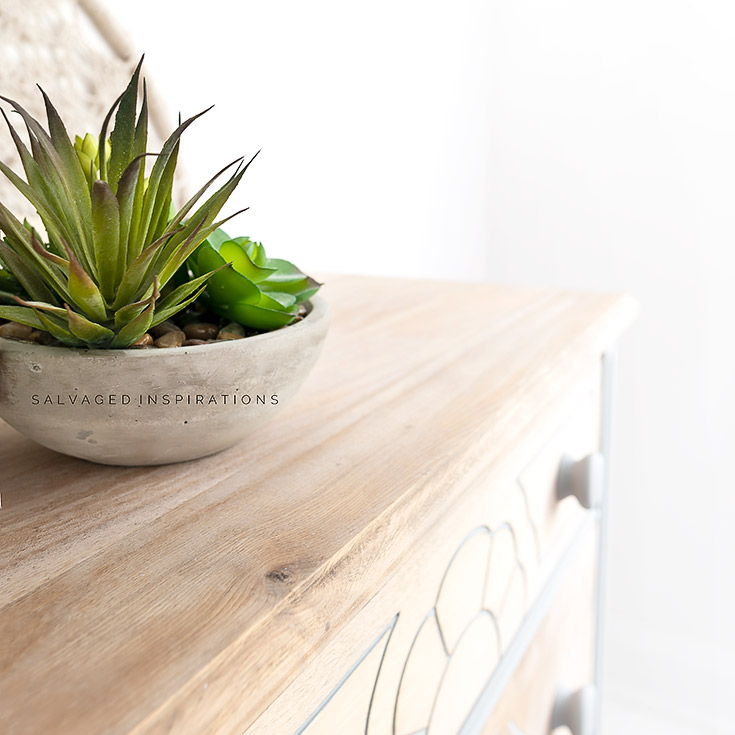
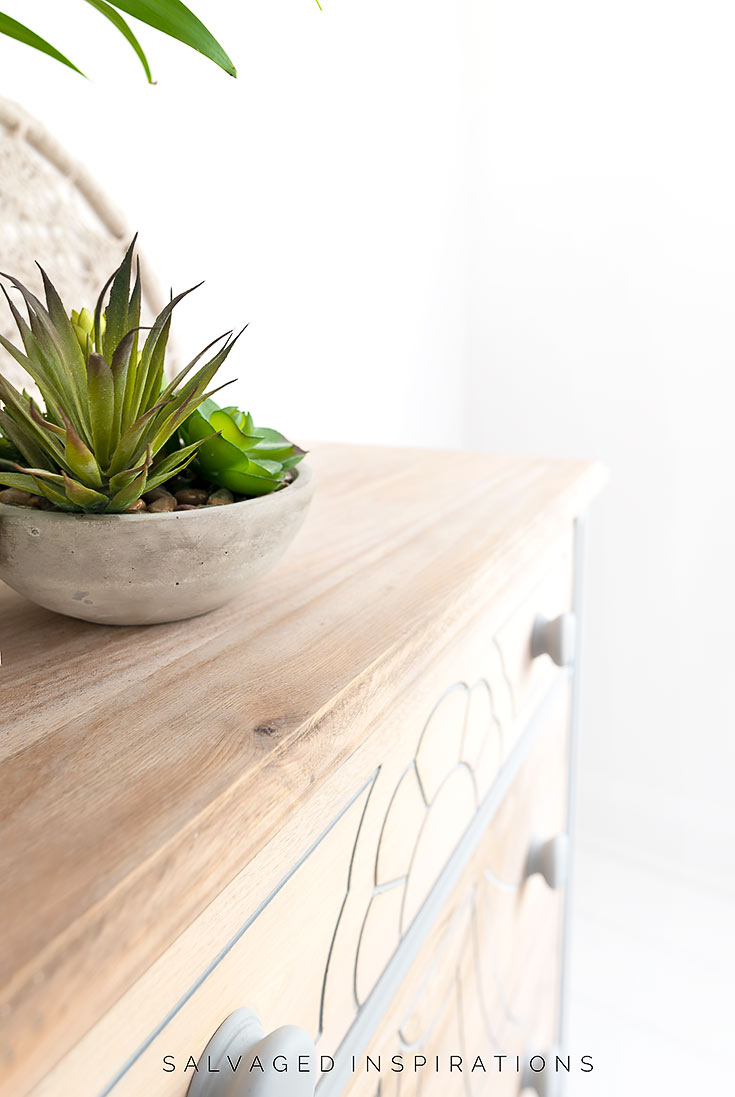
Here’s the bleached wood “after”. What do you think?
THIS POST IS SPONSORED/CONTAINS AFFILIATE LINKS TO PRODUCTS I USE. YOU CAN SEE MY FULL DISCLOSURE HERE.
SOURCE LIST
-
- Vintage Dresser – SALVAGED
- Bleach
- Spray Bottle and Sponge
- Gloves + Mask + Protective Eyewear
- CitriStrip | Putty Knife
- Sander and Sandpaper
- B-I-N Shellac Primer
- TSP or White Lightning Cleaner
- Manatee Gray
- Clear Coat Flat
How To Bleach Wood Furniture
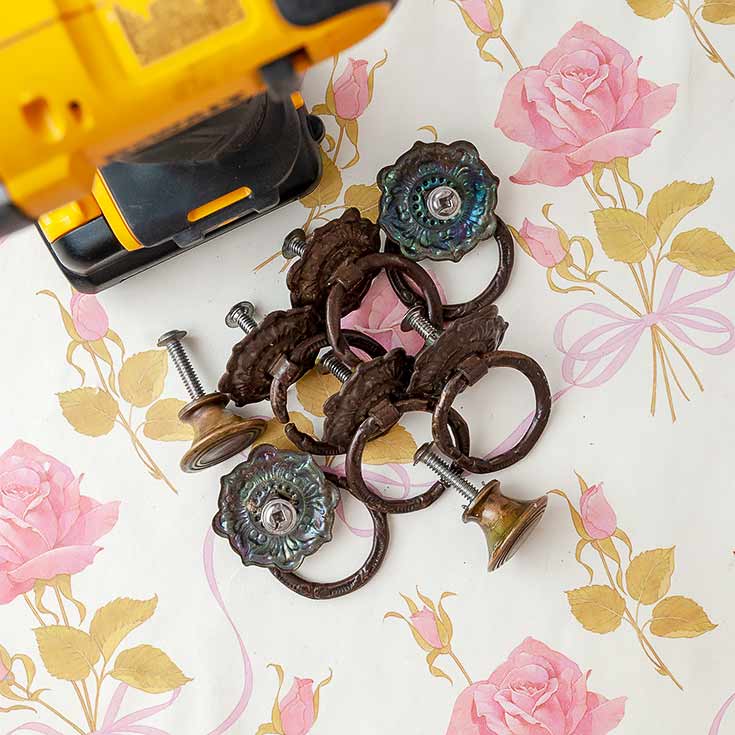
I started this makeover by removing the hardware and when I opened the drawers, found this rose paper. I just L•O•V•E surprise drawer liners! I have a collection of them but I don’t know what to use them for yet. If you have any suggestions, I’m all ears. 🙂
Because this was a FB Marketplace find, I gave this dresser a thorough cleaning with TSP. **TIP ~ The key to using any heavy-duty cleaner is to make sure ALL the residue is rinsed off otherwise, it can ruin your finish!
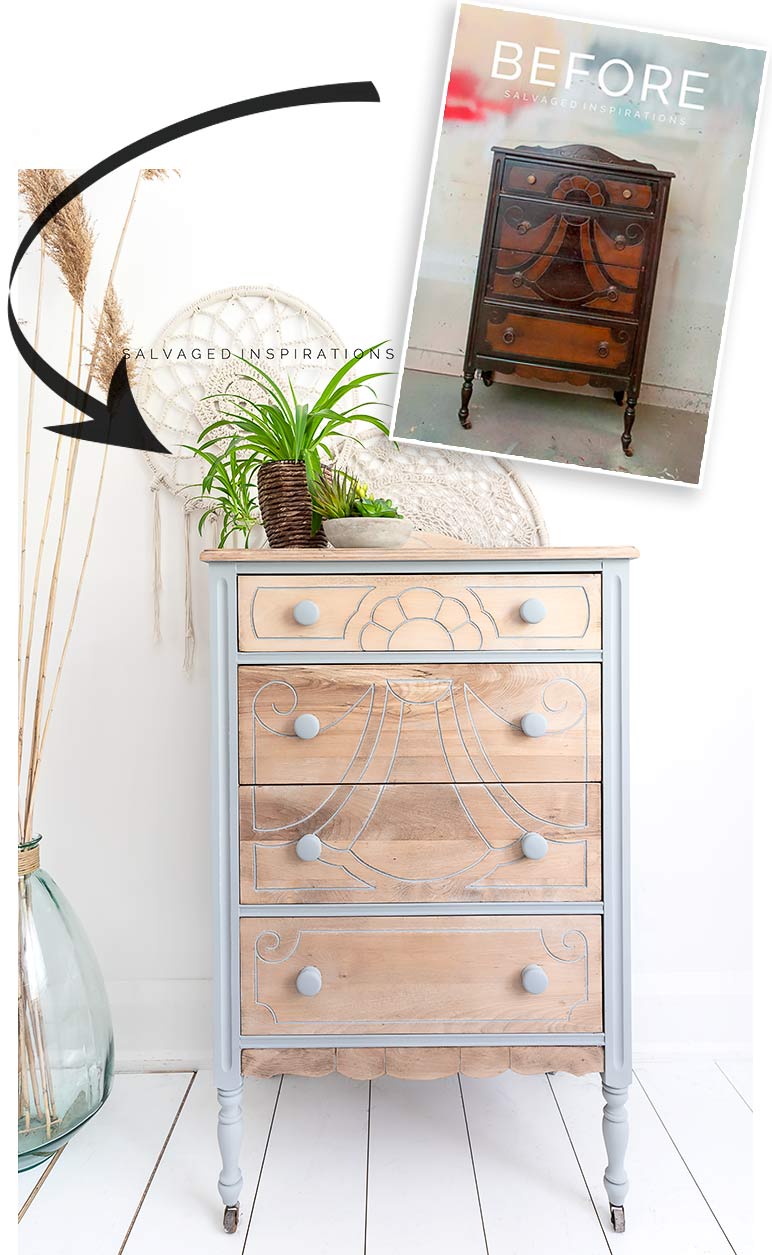
This vintage dresser was cute, but as you can see, some areas weren’t in the best of shape.
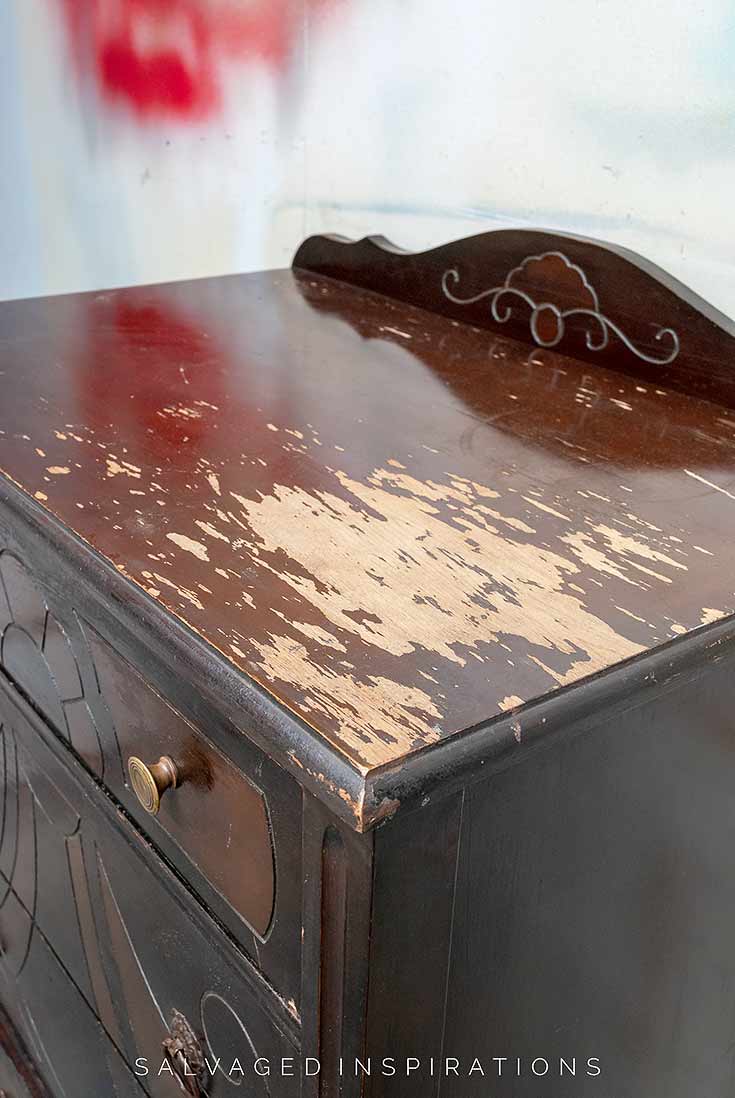
Using my favorite stain and paint remover, I stripped the top with Citristip and sanded down all four drawers.
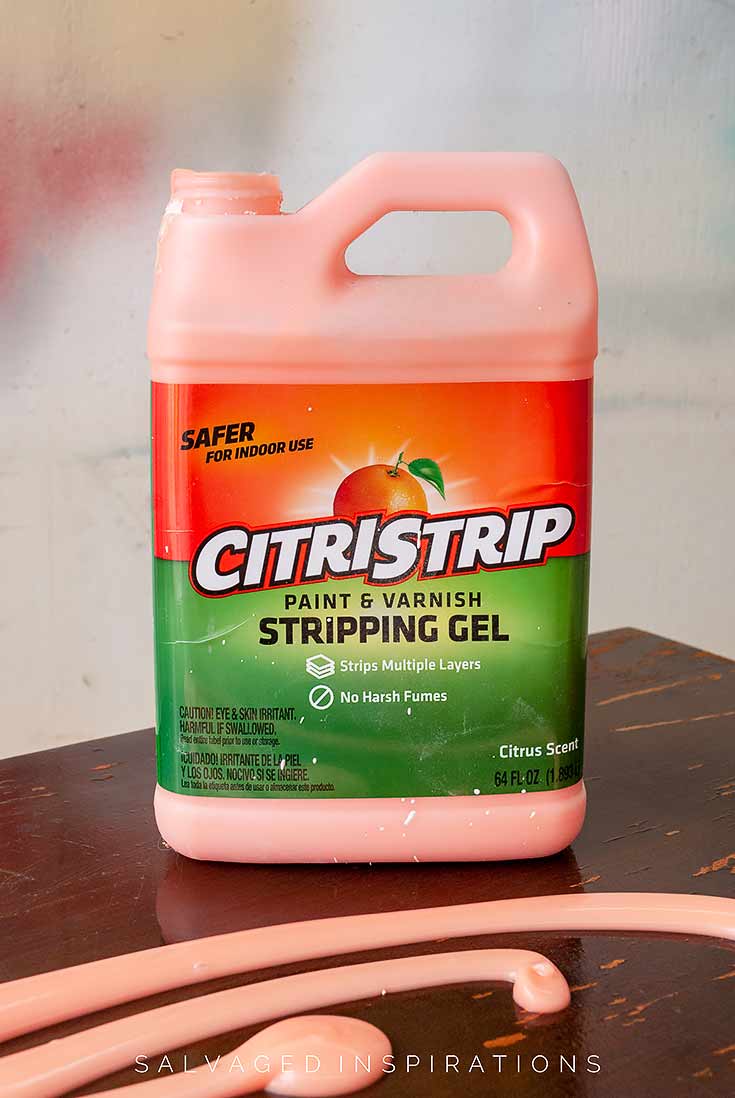
I have a full tutorial on how to strip furniture here.

The following day after the top was 100% stripped and dry, I filled a spray bottle with this household bleach.

*** Please, if you try this wood bleaching technique BE SAFE and wear protective eyewear, mask, and gloves while working outdoors OR in a VERY well ventilated area!
These are my very favorite spray bottles for cleaning. I keep a good few of them on hand. One is filled with water and vinegar. Another with TSP or White Lightening. And one just with water for rinsing my furniture. They are heavy duty and work great. And not just for furniture makeovers. They are amazing for household cleaning as well.

I sprayed the dresser top and drawers with full-strength bleach. I read a few tutorials that mentioned if the bleach was pooled heavier in some areas, the wood may not lighten evenly. So after giving all the raw wood a really thorough spray, I used a slightly damp sponge to absorb the excess pools of bleach.
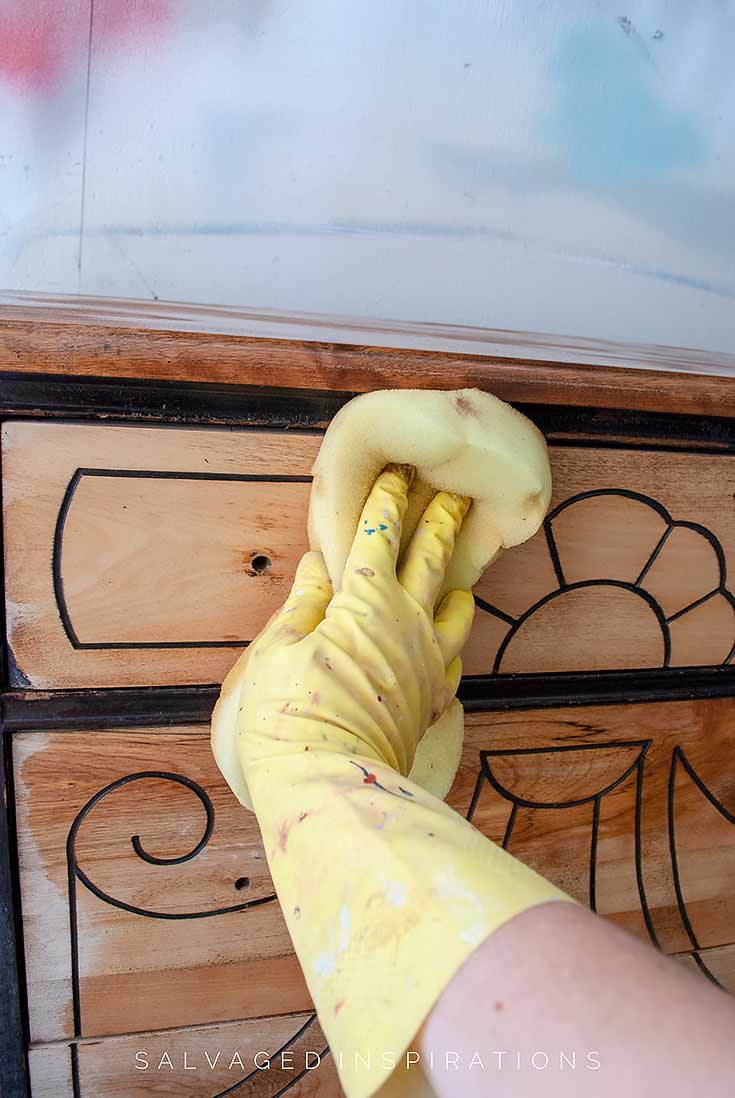
I waited until the wet Bleach was 100% dry – then repeated the above process four more times before I was [kind of] happy with the look.
I wish I had taken a pic all 4x but I was consumed with the process. Or maybe all the fumes killed a few brain cells. 😉 I remembered to document what I was doing on the 3rd and 4rth round. In the pics below you can see how the wood gets lighter.

Once the fourth round was all dry, I neutralized the bleach by giving all the raw wood a wipe down with a wet sponge. Once it was dry, I sanded the top for a super smooth finish.

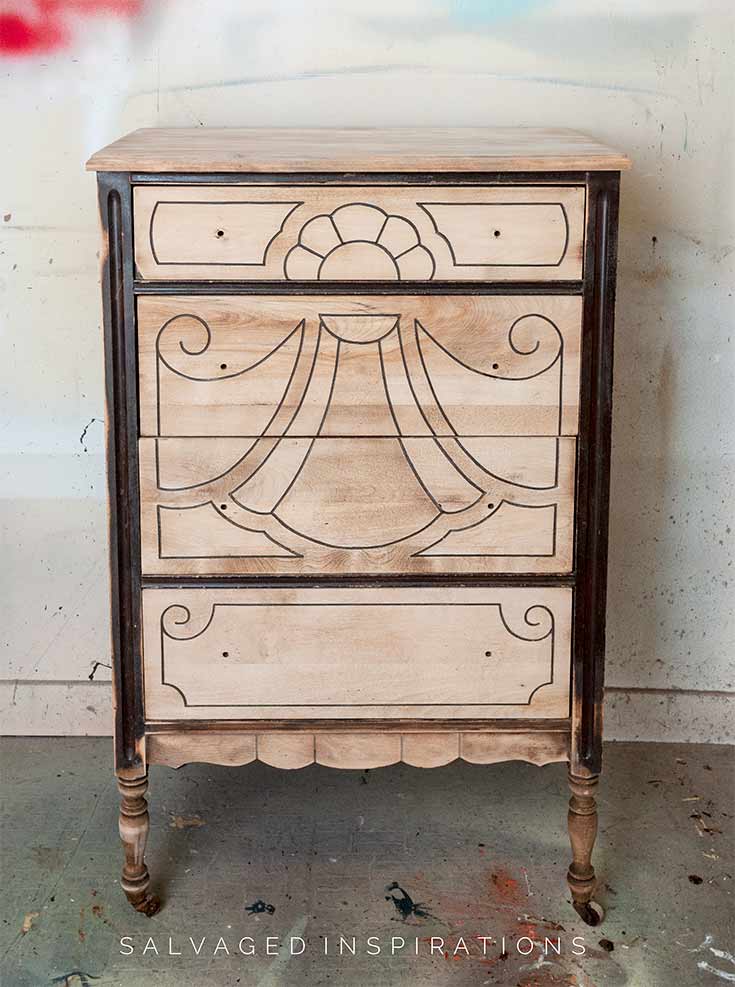
The body and inset designs were primed with BIN Shellac Primer. If you missed the post on how to stop bleedthrough using this primer, you can view the BIN Shellac Primer post and video here.
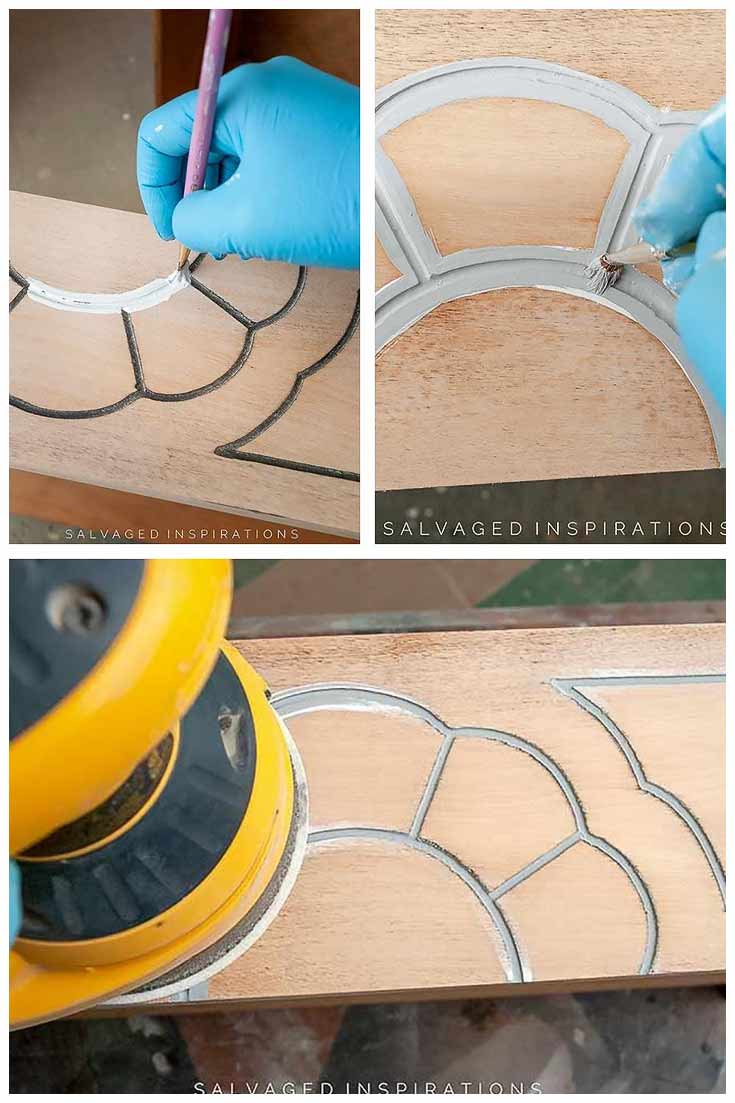
When I mentioned to my sister that I was planning on painting all the dark groove detail in gray she said that was brave because she’d never be able to do a nice clean job. Neither would I!
So here’s a little trick I use…
Taking an artist’s brush, I prime and paint in all the inset designs making sure to go outside the design. Once dry, I take my sander and sand the entire top taking off the overspill of paint and primer. This is the most precise and quickest way I know to get professional-looking clean detail work.
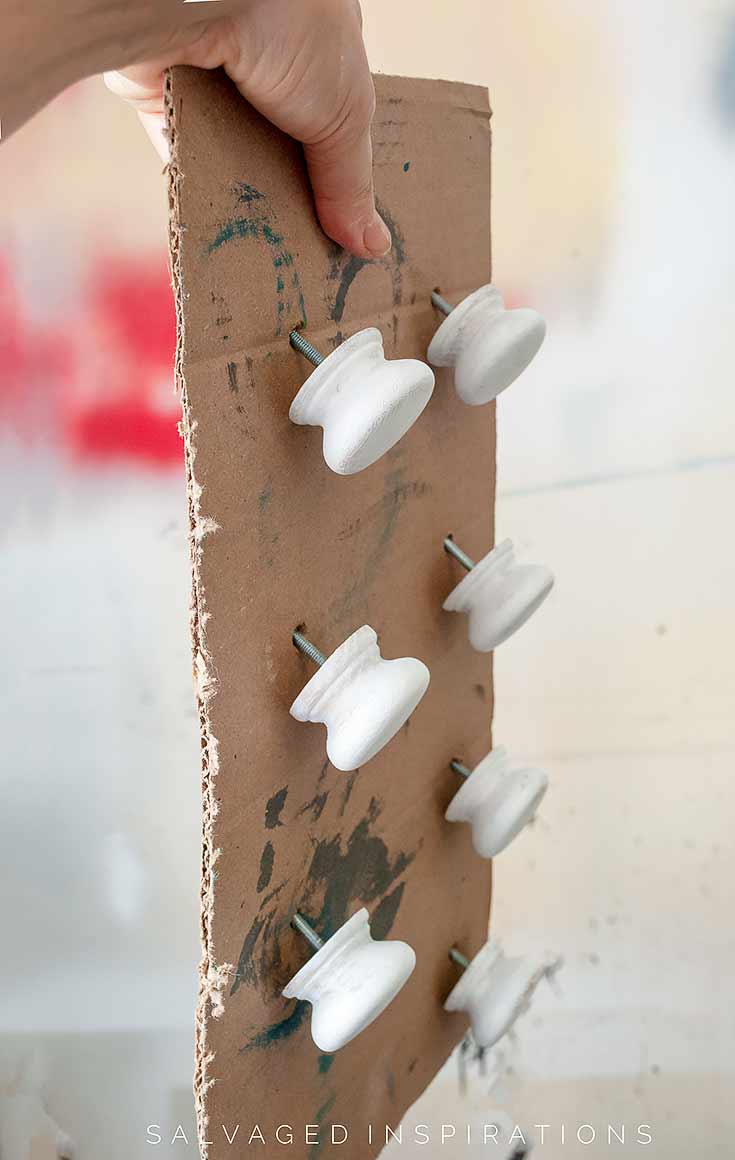
And here’s another tip when spraying knobs. I use a piece of cardboard to secure them for priming, painting and top coating.
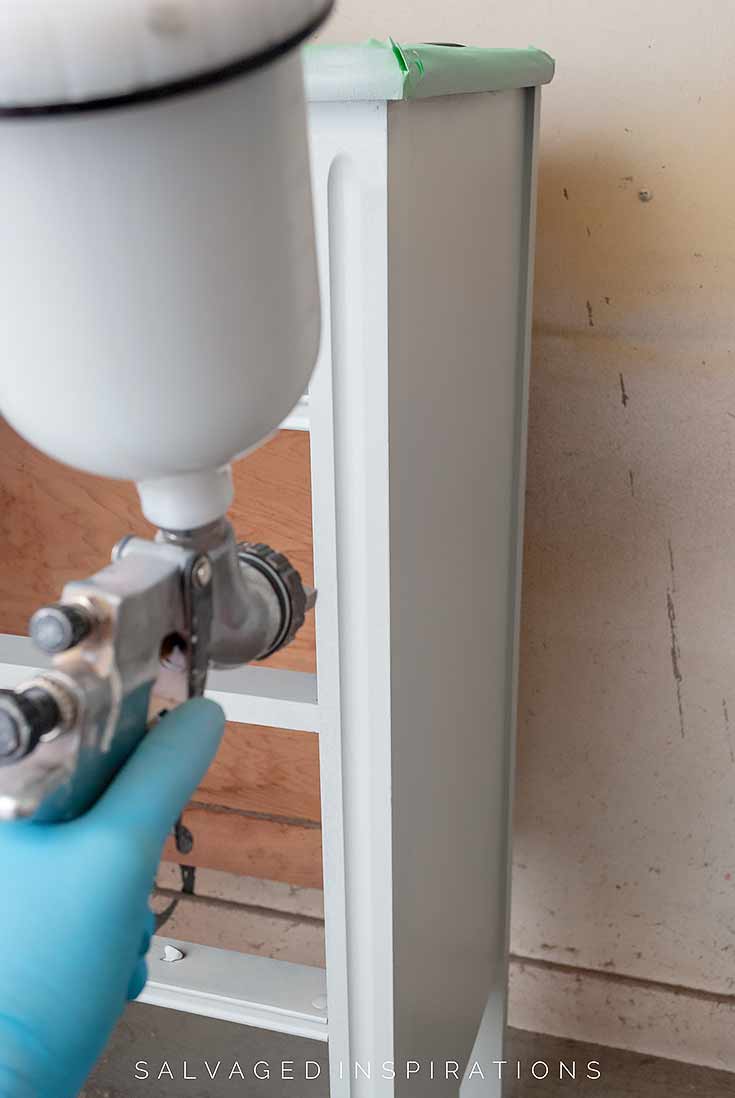
The body was sprayed in 2 coats of soft Manatee Gray and a Flat Clear Coat.
Here’s the finished look…
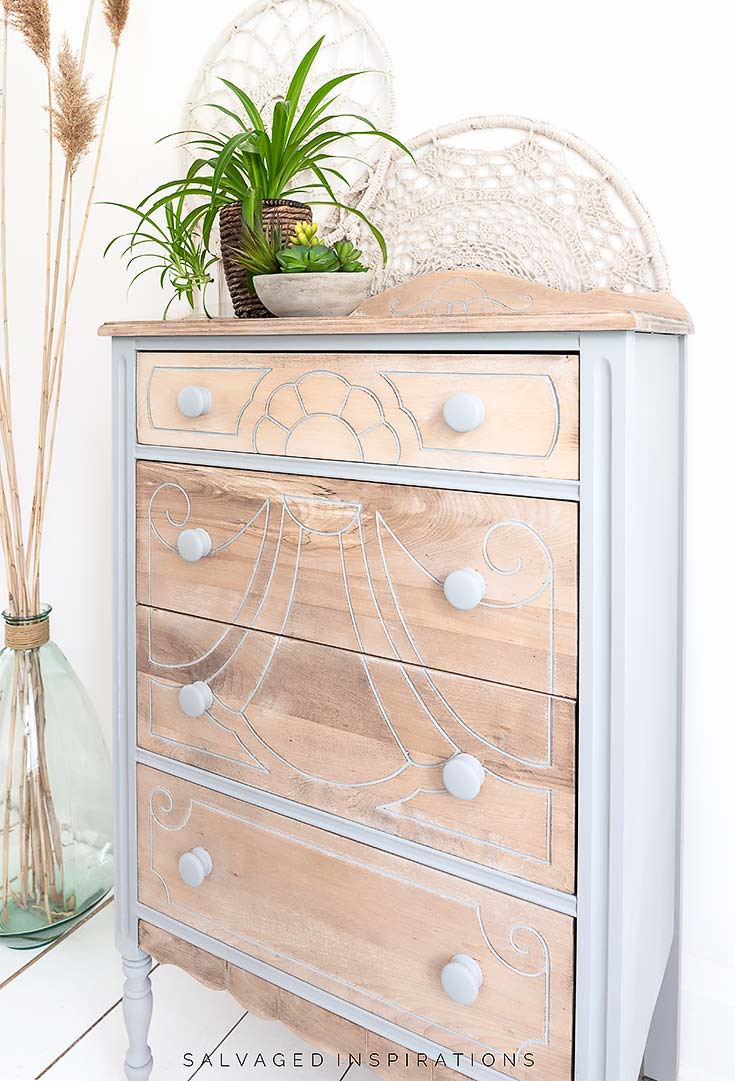
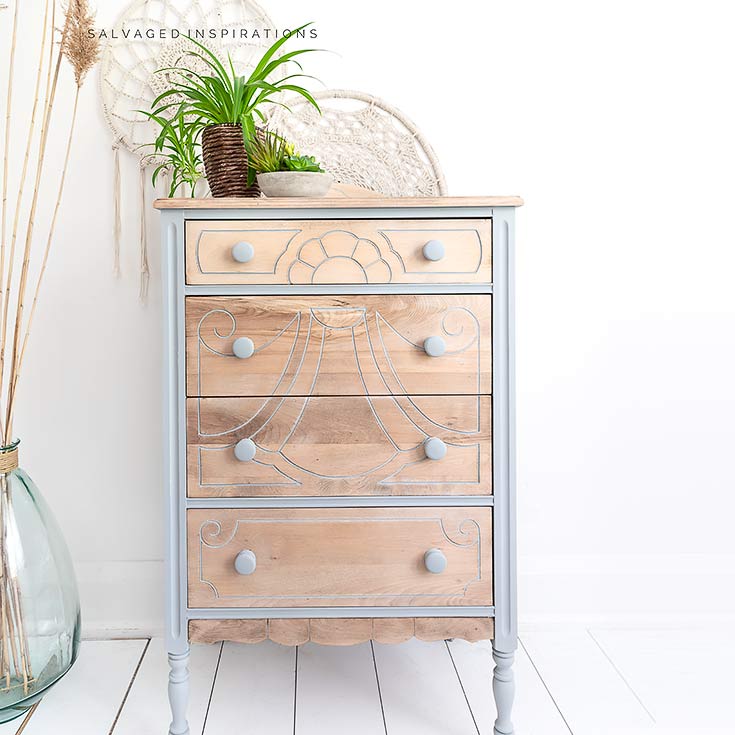
I think this dresser is adorable however I’m not as happy with the bleached wood as I thought I’d be and here’s why…
- The Bleach interacts with all wood differently so results are unpredictable
- If a piece has different types of wood or joined pieces of wood (which most furniture does!) they take to the bleach differently so it’s hard to get a uniform look
- It’s a smelly process and I much prefer working with environmentally safe products
- It was time-consuming waiting for each round to dry and then re-bleach
- Once a topcoat is applied it does slightly darken
I’m really happy I gave this a try. This vintage dresser turned out cute but I would have loved it even more if the bleached wood looked more consistent from top to bottom. Now that I’ve tried bleaching, I feel I have more control using a whitewash, white wax, or glaze technique to get a similar look.
I’d love to hear what you think of this makeover in the comments below!
And now for some TRASH TO TREASURE FUN!
I know you’re going to LOVE what this talented team of ladies share. They never cease to surprise me with their creativity! Below are their BEFORE photos. Visit the links underneath to see the amazing AFTERS and to learn how they did it! I’m heading over to take a peek too!
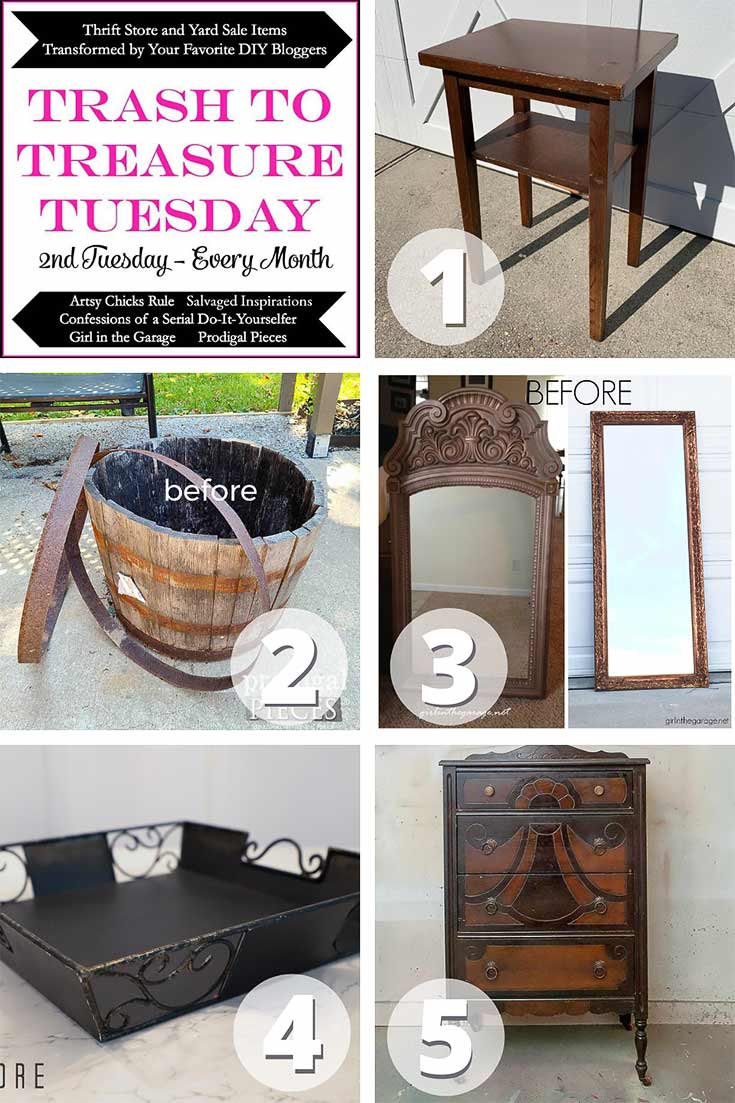
1. Confessions Of A Serial DIYer
5. Salvaged Inspirations (I’m so happy you’re here!!)
Here’s one last look at the before and after…
I’d love to know if you’ve ever tried bleaching wood and if you have any tips for me? Feel free to let me know what you think of this dresser. I always LOVE hearing from you!
Also, if you get inspired by any of my makeovers and give them a try, be sure to tag me on Insta or FB with #siblog. I’d LOVE to see what you’re up to and possibly feature your work!
Thanks for reading. 🙂
Wishing you a beautiful day filled with inspiration and Happy Painting friends!
Denise XO
RELATED POSTS::
How to Whitewash Wood
White Washed Wood Plant Stand
Annie Sloan White Wax Desk Restyle
How To Seal & Protect RAW Wood
How To White Wash Wood – Video
PIN AND SHARE!

Hi.. very interesting makeover. Could you please tell me if this process would work on IKEA furniture? I have a few dark brown pieces which need a makeover.
Thanks!!
If its stained REAL wood, yes it will work. 🙂
Hi Denise! I just love when you try new techniques and this did turn our beautiful. I don’t think it is anything i would try but that is because i don’t have the space. When my daughter was diagnosed with Cancer in February i downsized from a 4 bedroom with a garage to a 2 bedroom apartment, so i can be closer to her. It doesn’t stop me from using that other bedroom to paint my pieces but this would was more trouble for me. You are an amazing artist and i appreciate all your tutorials.
Ya, I would NOT recommend this without really good ventilation and appropriate workspace! I really hope you and your daughter are getting through these hard times and doing well Cheryl. Sending good thoughts your way my friend. XOXO
This is beyond GORGEOUS!!!!
Thanks, Becky! 🙂
Beautiful! Reminds me of driftwood. Would be perfect for a coastal/beachy decor.
Thanks Jen! xo
Beautiful dresser. What kind of paint sprayer do you use?
Thanks Kimberly! My sprayer is old but still works like a charm. It’s this Husky HVLP here.
I’ve not tried this, but will after seeing this piece. It looks great!
Thank Maggie and have fun! 🙂
This piece has a big wow factor, it was so unexpected and so beautiful.
Until you mentioned it I hadn’t given a thought to uneven raw wood on your piece; really. It just gives the piece character. I had a similar thing happen when I sanded dresser drawers to raw wood but really wasn’t so noticeable once I finished with clear wax.
I would love to try “bleaching” but think I will look for the oxalic acid as mentioned in the comment above. I had never heard of either treatment so would be fu.n to try it. Maybe “fun” is overly optimistic based on your experience..
Oh, and thanks for the tip on painting inserts. Smart.
Thanks for sharing.
haha, maybe fun is overly optimistic using the oxalic acid but I’m with you Joanne… I want to try now too!
How beautiful…thanku for the tutorial. Your so clever girl 😆 xx
Thanks so much Kaz! 🙂
Hi Denise,
Love this but you are so right about how the wood will take the bleach differently. But…this piece is beautiful. As for the drawer liners. One year I made several gifts using picture frames as vanity trays, drilling holes to add handles. Under the glass you can use your drawers. Very pretty. I actually used old christmas cards and “fancy” scissors. to trim the parts I liked. I even used parts of the cards along the edges. Everyone loved them. You can also use trays from local craft stores and then have your local glass company cut glass inserts Makes a lovely gift. .
I LOVE this idea, Kathryn! I’m sure everyone was touched by such a heartfelt gift!!!
I’m allergic to chlorine so I won’t be trying this technique anytime soon but the makeover is lovely, Denise!
Yaaaa, not for you!😬 Thanks, Marie, and I hope you have a great weekend. XOXO
Hey Lady, I have a similar piece and I love this idea to remake it for one of my granddaughters. As another commentator mentioned, there is a bleach made for wood, specifically wood floors, call “oxalic acid”. Supposedly it’s great at lifting the color of the grain, evening out any stains that might show up (on the floor, etc) and has little to no odor! I’ve been trying to come up with an excuse to use it so, THANK YOU! 😁
…”little to no odor” is music to my ears! No that I know this product is out there, I’m going to have to try it on something! Thanks for dropping by and have fun with your granddaughters dresser. I’d love to hear how it all turns out. 🙂
Denise, this turned out gorgeous! I’m not sure about trying bleach either (I can’t stand the smell), but it worked perfect for this piece. I’m glad to hear we have some of the same “tricks” up our sleeve for painting furniture! xo
Thanks Jen! And ya, I don’t like the smell either but I’m glad I gave it a try. Now that a few readers have mentioned the specific “Wood Bleach” I’m itching to give that a try…lol.
Am inspired to try bleached wood on a small table of mine. Just love how this piece turned out! I agree with Christie that you took it to a whole new level! Well done.
Thanks Tess! If you try this on your small table, I’d love to hear how it turns out for you. I’m sure all woods take to the beach differently so I’d be curious to hear.😊
I like your way of painting the insets. The easiest way i found to do them was by mixing my paint color with glaze in a ratio so it’s not so translucent while still having a longer open time. This way, I could paint by hand, be a little sloppy and then easily wipe off the over-paint with a damp rag. It goes very quickly and looks tidy afterwards. I’ll continue doing it this way when painting insets over another paint color but I’m totally adopting your way when painting them over raw wood!
I have bleached wood too and had similar feelings as you. it was smelly, took a lot of time and I wasn’t completely pleased with the way areas of wood took the bleach differently. That said, this dresser is stunning! Absolutely stunning. The variations in wood tone give movement to the piece and the Manatee Gray perfectly off teh wood. You took this piece to a whole new level. I love it when you try something new!
Thank you for sharing your adventures! You instill a sense of bravery in me, making me happier to try new things and to push my skills further.
Thanks so much, Christie! 💙 And I have to admit I’m glad to hear you had a similar experience and it’s not just me. 😐 I won’t be using this technique any time soon but I am curious about the designated wood bleach and if that would make any difference. ?? And thanks for sharing your glazing tip with everyone! 😊 I’ve also worked with glaze painting details over paint and it works beautifully!
OH my gosh, yes! When I was researching bleaching furniture for my recent post I decided not to go the actual bleach route. It seemed like more trouble than I wanted to deal with! lol It was much easier “mimicking” the look instead. But I may try it at some point. You never know with me! 😉
If you ever get the urge you might want to give it a try to get it out of your system 😂 … and I know whatever you do would look absolutely fabulous! But ya, mimicking the look – I feel I get more consistent results for sure.😊
Despite everything, it turned out really pretty. I’m with you, though – I think I’d rather avoid using bleach. But this is really pretty! 😀 Thanks for trying this technique out and sharing it with us, Denise!
My pleasure Marcia and thank YOU! 🤗
Holy cow, that is gorgeous! I absolutely love what you did. You are an inspiration. Can I ask where you get Citristrip? I believe you live in Ontario, I’m out in BC and had a look at home depot and didn’t see it.
Thank you for making things beautiful again!
Thanks, Angela! 🤗 I buy my CitriStrip here or when I cross the border (I’m only 40 minutes away from Buffalo NY) I buy it at the Home Depot there which is much cheaper@
I think this may be my favorite make overs I’ve seen in a long time. My furniture style is more contemporary & this dresser fits right in. Don’t concern yourself w/ the wood lightening differintly, I like it and call it shadowing.
Great looking dresser, you created a great design!
Thanks so much Sher!💕
This is so gorgeous!! Great job!!
Thank you Mona! x
I think it’s absolutely darling!!!! And, I love the different shades of the bleached wood, it adds so much character! Great job! And many thanks for the tip on how to paint the grooves and get crisp lines.
Thank you Vicki! I’m starting to look at the different shades through a different lens thanks to all your encouraging comments! 😉 And I’m so happy you found the painting tip helpful. 🙂
This is feminine light and airy. I love the bleached look and the varience in wood tones. Beautiful work and thank you for sharing all your valuable tips! ~ Nicki
My pleasure Nicki and thanks so much! XOXO
Simply stunning. I so appreciate your tips for painting grooves!
Oh I’m glad Susan… it makes it super easy and looks perfect. 🙂
I love this look and think the end result is gorgeous! I understand what you’re saying about the unevenness of the bleached result, but… It’s an antique and I feel it just ads to the charm of the piece. I never expect antique refinishing to end up perfect. It’s part of the fun! Great job!
Thanks, Barbara and you’re right! Vintage furniture always has it’s a quirky charm.😊
The light with the bleached wood is a lovely combination. I’m sorry you’re not 100% happy with it it I’m sure there’s a huge number of people who would love to have! Me included!
Ya, I’m not 100% happy with the outcome but maybe I’m being too particular.🤔 Sometimes you just need someone to give you a friendly nudge to see something through a different lens. 😊
I LOVE the look ♥️
Thanks Ann! 🙂
Hi, I think the bleached wood dresser is gorgeous! The variations in color give it personality. Thanks so much for your detailed tutorials, I always learn something from each one. I am new to furniture refinishing, and my question about today’s makeover is why did you elect to strip the top of the dresser before sanding rather than sanding all the old finish off? Thank you for sharing your talent.
Ah, I should have explained a little better. I wanted to see if there was any difference in the bleaching process between sanding and stripping. And there was! The sanded drawers took to the bleach much better than the stripped wood top. Great question Jessie!
I am an avid “viewer”, and love your work. This is my first time commenting because this is just so so so beautiful!!!!!
Hi Debbie and thanks for taking the time to comment! I really appreciated it!!! And I’m so glad you like this dresser. You put a BIG smile on my face.😁💙
Thank you for sharing all your hard work and talent. This is a lovely piece. I want to try to use the same technique. Again, thank you.
If you give this a try I’d love to hear how it all works out for you Jeanie! And thank you!😊
Hi Denise is always beautiful work I always look forward to your posts! I have a question about bleaching a pine desktop. How do you think this technique would work?I’m trying to keep away from the orangey stain of pine
Hi Ellen! I read an article on Bleaching Wood here and it mentions that pine wood is light in nature and sometimes doesn’t bleach that well. ?? I’ve never tried so I’m not sure but maybe doing a little more research or trying it on a scrap piece before you do your pine desktop would be helpful.
You were very brave to try it because bleach has such a strong odor but it turned out beautifully!
Thanks, Sue and it does! It small quantities I don’t mind the smell. For some reason, it reminds me of when I had a swimming pass at Angela Coglin Pool and I used to swim in the chlorine water every day. ha But spraying all this wood, I had my windows open. Industrial fan sucking the smell out and my respirator mask on. I MUCH prefer working with non-toxic products but I’m still really happy I tried this out. 🙂
Hey, Denise! I bleached my old, and very dark, huge fireplace mantel, just before doing a whitewash painting of the equally dark brick. I sanded it down, first, then did three rounds of bleaching. Once it was where I wanted it, I rinsed it, let it dry thoroughly, then applied polyurethane, to seal. It is a process that I would probably use again, if the right project came up…like my downstairs mantel.
Good job!!
Your fireplace mantel sounds amazing Susan!! Did you use regular household bleach Susan?… or wood bleach?… if you don’t mind me asking. Prior to this post I didn’t know there was a specific bleach for wood. I’m wondering if it makes a difference?
Regular Clorox bleach, straight. I’ve never heard of ‘wood bleach.’
Me neither… until now. Thanks for this Susan!🤗
I love it! Will need to try it. I’ve a question…do you find any difference between household bleach and wood bleach?
I’ve never tried wood bleach. And to be honest I didn’t know there even was a wood bleach! I’m going to look this up. Thanks, Beatriz!!!
I thought the bleached wood was so updated looking for right now. You tried such a large piece , but it looks so fresh. I may consider trying
If you give it a try Laura, I’d love to hear how it works out for you! 🙂
I LOVE IT!!! It’s beautiful!! I actually like the differences in the natural wood colors.
Thanks so much Kate!💙
This is a keeper! I love what you did to the grooves, and I like the different wood tones! Thank you for sharing!
My pleasure and thanks so much Terry!😊
Its beautiful, sorry you had to deal with the fumes of the bleach. I’d love this piece in my home its gourgeous !!!
Thank you, Kim! And ya, I’m so glad I tried but I probably won’t be bleaching wood gain any time soon…lol
Hi- I have a very similar dresser. I love what you did to yours. That was a lot of work! But the difference is incredible. I understand what you’re saying about the slight differences in the wood colors, but that’s why I love it. I just can’t say enough about it. You took a dark almost medieval piece and made it look like a garden trellis. Am I going to attempt the same thing? That’s a bit too daunting for someone at my elementary level, but seeing this makes me want to something to mine! If I didn’t make this point yet, I think it’s gorgeous. Thanks for sharing!
Hi Sue! Well, it seems the variance in wood is a hit when I thought it was a miss…lol. Thanks so much!💙
I think it looks amazing, Denise! And I kind of like the variations in the wood, but I totally understand not wanting to work with the fumes for sure! You always have such great vision! XOXO
Thanks so much, Christy! And it seems like a lot of people are liking the variance in the wood… maybe I’m being too picky..lol.
I liiiike 🥰
Thank you Zora!🤗
This is one of my favorite pieces you have ever done. I love the light look and varied look as well. It’s brilliant. I want to bleach something now. Thank you for doinG this process.
Thanks so much Rae Anne!🤗
I LOVE how this turned out! However, I can understand why you wouldn’t want to do it again 😉
Thanks Carolyn… and ya, you get me..lol😉
This turned out beautifully! I have my grandmothers armoire I been waiting to refinish. This may be what it needs. xo 😘
Thanks my friend. And I know whatever you do with your grandmothers armoire will look gorgeous! Hugs
I really like how it turned out. It has character with all the different woods. I don’t think it would be as pretty if it was all uniform.. I just finished whitewashing a table top. We had. a dickens of a time getting the old stain and varnish off. Stripped it twice and even belt sanding with 40 grit didn’t get it all.. I have some splotches that didn’t even show up until it was stained. I was hoping they would mellow out with the wash but not. On the fence as to leaving it as character or trying to sand and maybe bleach that section and see how that looks. 😩 Always something. Thanks for all your great tips and tutorials. One of the best tips ever about painting in the grooves!
Stripped 2x and belt sanded with 40 grit Susan! Maybe those blotches deserve to stay…LOL! Whatever you decide I know it will be absolutely gorgeous. And so glad you found the “painting in the grooves” tip helpful! Have a super week. 🙂
I think it is stunning!!! Great job!
Thank you Lisa!😊
Just beautiful!
Thank you, Paula! 🙂
I think this dresser turned out beautiful. I know what you mean about how the wood didn’t lighten up evenly, but it makes the piece look interesting. This wouldn’t be a technique that I would attempt. I’m not a fan of bleach for cleaning or anything else.
Thanks Maryellen! And as a side note – I’m not a fan of cleaning with any type of product! 😆🤣
Your dresser turned out beautiful!
Thank you Lorrie! 🙂
I hope you do more bleached wood projects. It is so beautiful. My favourite project yet!
Thank you, Sandra!🌸
Honestly, I think the slightly different results make the piece look wonderful. I didn’t;tknow it was possible to bleach wood with, well, bleach–I want to give this a try. I love your result.
Thanks Susan! If you give it a go I’d love to hear/see your project! #siblog 🌼
Hi Denise. First of all, I have to tell you this makeover is GORGEOUS! This dresser looks so clean, crisp, and pure pretty. Love it. Second, I agree with your sister. I also would have been scared to paint in the decorative grooves. Thank you for sharing your tip. Finally, I’m going to say another huge THANK YOU! I appreciate how you HONESTLY tell us about products, new techniques you try, and pieces that turn out completely different than you originally imagined. It’s always a joy to know Tuesday is here and I can read your blog:)
Thanks so much, Monique! And I’m glad you found the tips helpful. Sometimes it takes someone (in this case my sister) to point out things that are worthy of a share!. Have a super week my friend. XOXO
Wow! I can tell you worked hard on this. It’s beautiful!
Thanks my friend! It was an interesting learning experience. 😊
Thank you for those 2 painting tips, so simple, but I would never have thought of them myself!
You did a beautiful job on the dresser but personally I thought it was a bit boring in comparison to the other beauties you normally produce. Glad you got it out of your system 🙂
Thanks, Heather and glad you find the tips helpful!